
Selecting a Name from a NAB
There are functions throughout the EZ Suite that will require you to select names from a NAB within your environment.
In order to find and select the name that you need the EZ Suite tools offer a standardized Name dialog with multiple options for finding the proper name, regardless of the number of servers and/or NABs within your environment.
The Names Dialog
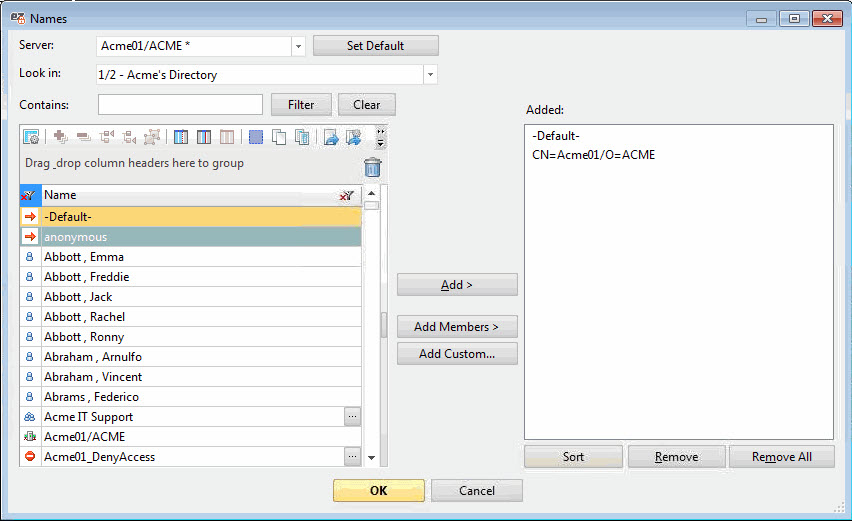
The Names dialog offers a range of options to let you find and select names from your environment.
The following information fields and options are available to select the server/NAB that you want to choose your names from:
-
-
Server: This dropdown list shows all servers available to select.
-
Set Default: Lets you set a default server to use when opening the 'Names' dialog.
-
Look in: This dropdown list shows all NABs available to search in.
-
Contains: This field lets you enter a string to search for among the names in the selected NAB.
-
Filter: This excludes all names except those containing the string entered in the 'Contains' field.
-
Clear: This will clear the string filter used and revert the names list to its full state.
-
|
NOTE |
The list of servers that appears in the Server drop-down list may not look the same as what you see in Notes.
|
|---|
The names in your selected NAB are displayed in a GridView-enabled panel on the left of the dialog.
On the right of the dialog is a list of the currently added names.
-
-
Add: Use this to add names selected on the right to the currently added list on the left. You may add more than one name at a time.
-
Add Members: Use this to add all individual members of the groups selected on the right to the list.
-
|
TIP |
Clicking 
next to a given group name will show you the entire list of members belonging that group. |
|---|
-
-
Add Custom: This lets you add a custom name value to the list manually.
-
Sort: This will order your list of selected names.
-
Remove: This will remove selected names from the list of currently added.
-
Remove All: This will clear all names from the currently added list.
-
OK: Launches the Effective Access calculation.
-
Cancel: Closes the dialog and cancels the currently added names.
-