Security and Compliance Activities
The sapio365 solution makes it extremely easy to research and spotlight security and compliance issues that exist within your customer tenants. Here are a few examples of how to find those problems so they can be remediated accordingly.
Find User Accounts with Weak MFA Settings
With sapio365, you can quickly get a global view of all the users and their chosen MFA methods, all in one place. With this information at hand, you can filter out users with approved methods to get a summary of all the users with weak methods (i.e. SMS). Then you can select them all and force them to reregister the next time they sign into Microsoft Office 365.
Follow these three simple steps to build that view of user account entries and identify if your tenant has any user accounts with the incorrect MFA settings.
Step 1: Load the MFA info to your Data View
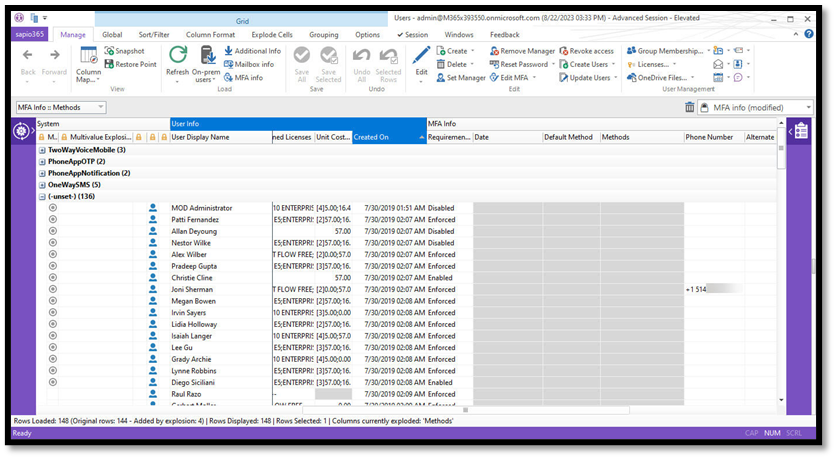
From within your View showing all user details, select all accounts and then use the button ‘MFA Info’ to load the additional details of security settings for multi-factor authentication.
Step 2: Categorize the View by MFA Setting Type
An extremely powerful option in the Grid View area allows you to group, or categorize, the listing of information by a specific data attribute, or multiple attributes. There are a couple different ways to group the information in a grid view. You can ‘Right-Click’ on the specific column and choose the option for ‘Group this Column’ or you can simply drag and drop that column to the upper left-hand side of the grid area called the ‘Grouping Zone’.
For this task, please drag and drop the ‘Methods’ column to the upper left-hand side of the grid and it will build the categorized information to view the user accounts by their MFA Settings Method (see screenshot below). Now if you use the ‘Shift Minus’ option, or the ‘Collapse All’ button from the ‘Groupings’ tab in the ribbon, it will show you all the configurations for different MFA security settings for your users.
Step 3: Perform Necessary Changes to Update MFA Settings
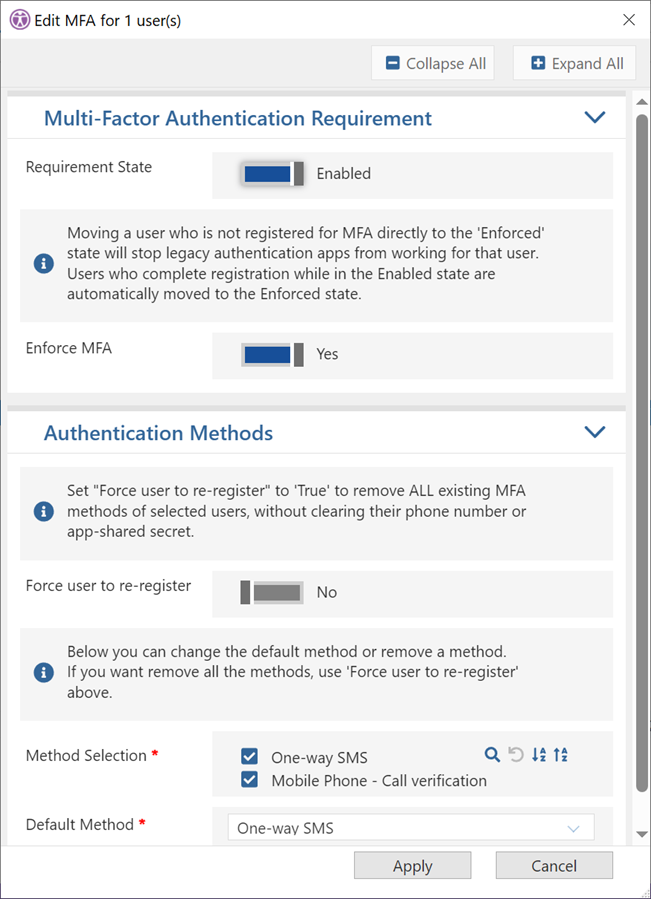
With the information provided in this view you can take action and make the necessary updates. Select the users you want to update and then click on the ‘Edit MFA’ button in the ‘Manage’ tab of the ribbon. This will provide an actionable pop-up window to select the changes you would like to apply.
Identify Users without Recent Password Updates
If you would like to see a report on the specific users accounts that haven’t changed their password by a certain cutoff date, say 6-months, then you create this custom data view and schedule a report that will be sent to you weekly or monthly. Follow these steps to create this report and schedule it as a notification to you and your team if any accounts match this compliance issue.
Step 1: Create custom view of user password changes by a specific cutoff date
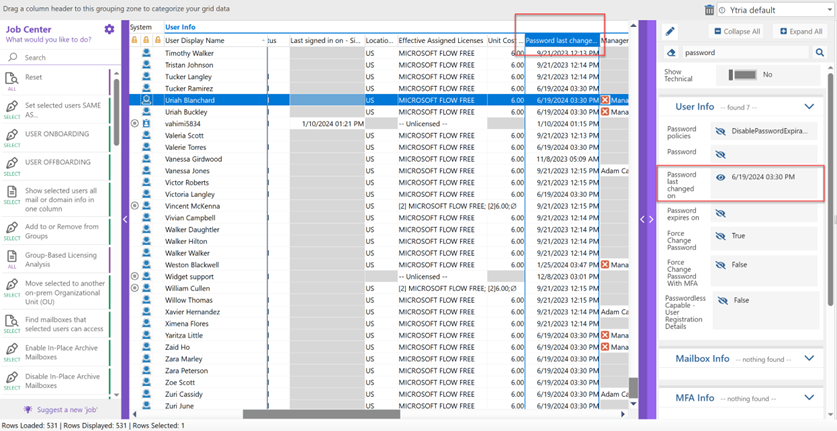
Starting with a view showing all users in your tenant you need to add the data field called ‘Password last changed on.’ You can use the right-side information panel by clicking on the arrow near the notepad icon. From within the information panel, type in ‘password’ in the search box and then click the ‘Eye’ icon next to that data field shown in the available ‘User Info’ listing so that fields is available in your view, as shown in the graphic below.
Now to simplify and cleanup this view, you should hide all user accounts that are blocked from accessing the tenant. Simply right click on the ‘Sign-in Status’ column and choose the option for ‘Text Filters’ in the drop-down menu options. Then in the pop-up window for sorting, type ‘Allowed’ into the entry for ‘Text is equal to’ and click on ‘Apply’ (ass shown in the screenshot below).

You will then receive a filtered view that only shows user accounts that are active. Now you can apply the filter for the password change date to show ONLY those accounts who haven’t changed their password recently.
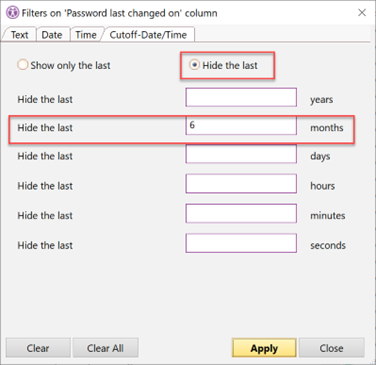
To create that filter, right-click on the date column called ‘Password last changed on’. From the available menu select the option for ‘Cutoff date/time filters’, and then in the pop-up menu you can enter the cutoff days for your filtered view. In the example in this screenshot, we use a ‘6-month’ cutoff in the MONTHS field to show ONLY those user accounts who haven’t changed their password in over 6-months.
Step 2: Schedule a report creation based on this view and send out a notification via email
If you would like to receive this report on a regular basis you can schedule it to run within sapio365. First you should save this new view and give it a unique name. To save the new view you customized, simply click on the drop-down views area in the upper right-side corner. Select the option for ‘Create new view’ and provide a unique name, such as ‘Users with OLD Passwords’.
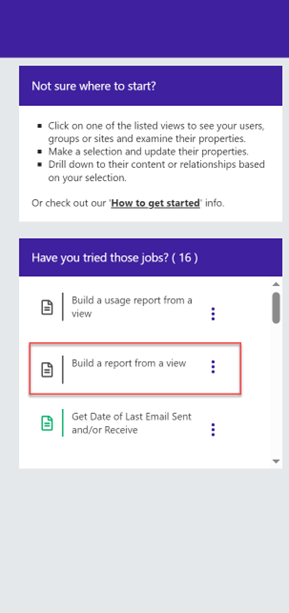
Now proceed to the main sapio365 admin screen and click on the three-dots next to the section called ‘Build a report from a view’ as shown in the graphic below. To get back to that main screen, simply use the available windows option from the sapio365 icon in your task bar.
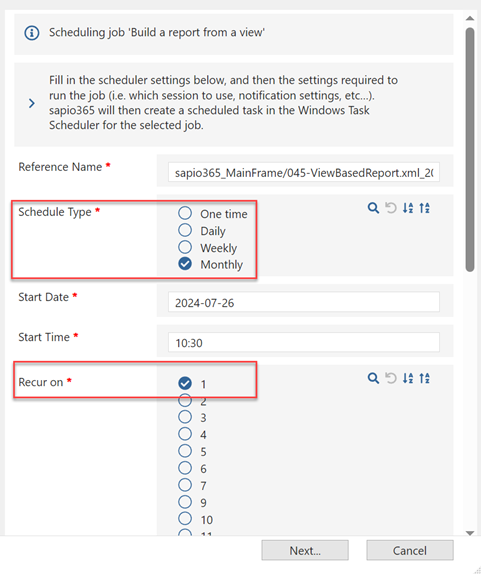
Click on the option for ‘Schedule this job’ and follow the prompts to select your newly created custom view. In the screenshot below we provide an example of these windows. Select your frequency to run this job. As shown in the screenshot here we are scheduling this to run Monthly.
In the next screen you can choose whether to e-mail you a copy of this report and/or save it to a specific Folder area on your computer.
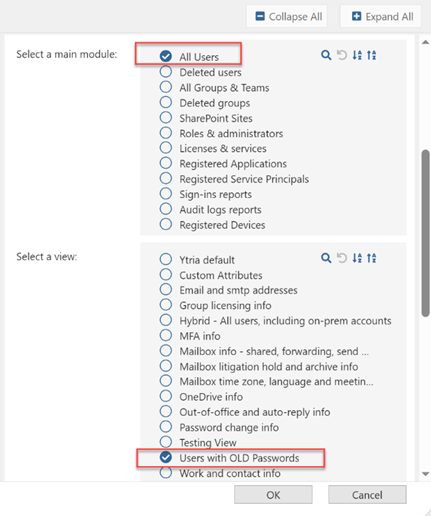
Select ‘All Users’ from the main module option, and then select your custom view that was saved previously. Then click the OK button.
You can view this newly created JOB from your main admin screen by selecting the ‘My Jobs’ button. This will show you a view of all scheduled jobs and list the ones you have run recently. You can kickoff any of these jobs from this view by simply clicking on them.
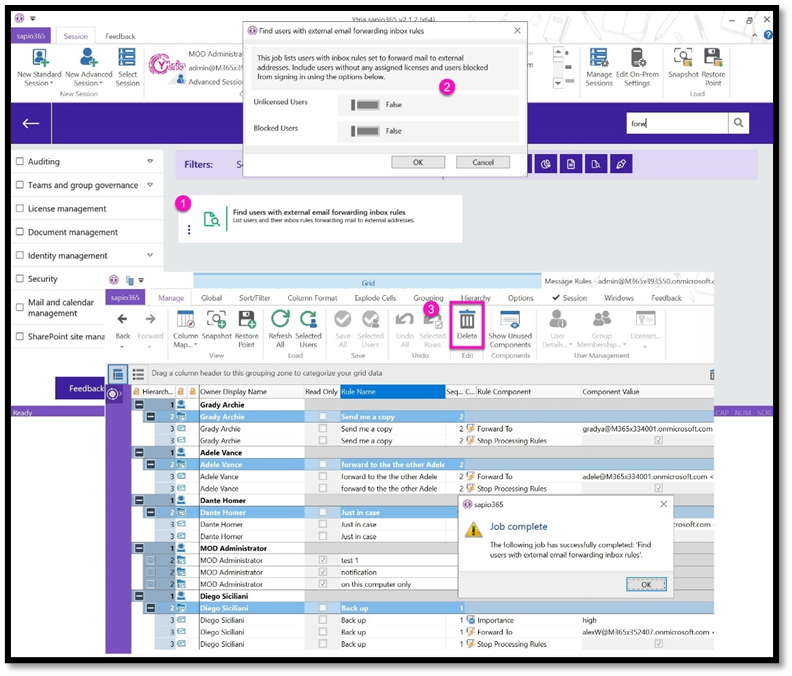
Find E-Mail Auto-Forwards Going Outside the Company Domain
With sapio365, you can quickly identify all the users with E-Mail Auto-Forwards that are set incorrectly. With this information at hand, you can take the appropriate steps to close this security compliance issue.
Step 1: Find User Accounts with Bad Forwarding Addresses
There is already an existing JOB created to identify these accounts. From the ‘Users’ data view click on the left-side navigation search area of the ‘Jobs’ listing and type in ‘External’. This will filter out all the jobs and show you the one titled ‘Find users with external e-mail forwarding rules’. Run the job and it will give you a Pop-up window to select what kind of accounts to search.
Step 2: Review Auto Forward Addresses and Make Updates
The updated View will show the users with e-mail auto forwarding issues. Select the accounts that you want to update as needed.
Identify Groups with No Owners or No Members
With sapio365, you can quickly identify all the Groups that no longer have an owner listed. With this information at hand, you can take the appropriate steps to close this compliance issue.
Step 1: Find Groups with No Owners or No Members
There is already an existing JOB created to identify these groups. From the ‘Groups’ data view click on the left-side navigation search area of the ‘Jobs’ listing and type in ‘Owner’. This will filter out all the jobs and show you the one titled ‘Find ownerless / memberless groups’. Run the job and it will give you a Pop-up window to select what kind of groups to search.
Step 2: Review Group Details and Make Updates
The updated Data View will show the Groups that match your criteria. Select the groups that you want to update as needed.

Find Anonymously Shared Files
Microsoft 365 gives users several ways to share documents, one of which is by generating an anonymous URL link that gives access to a document or folder to anyone who has the web URL. This method has its uses certainly, but it remains one of the major concerns of administrators because it can be a potential source of data leakage.
With sapio365, you can quickly identify files in SharePoint and OneDrive with these anonymous links. With this information at hand, you can take the appropriate steps to close this compliance issue.
Step 1: Find Anonymously Shared Files
There is already an existing JOB created to identify these groups. From the ‘All SharePoint Sites’ data view, click on the left-side navigation search area of the ‘Jobs’ listing and type in ‘Anonymous’. This will filter out all the jobs and show you the one titled ‘Sites with shared anonymous files’. Run the job and it will give you a Pop-up window to select what kind of groups to search.
Step 2: Review SharePoint Site Details and Make Updates
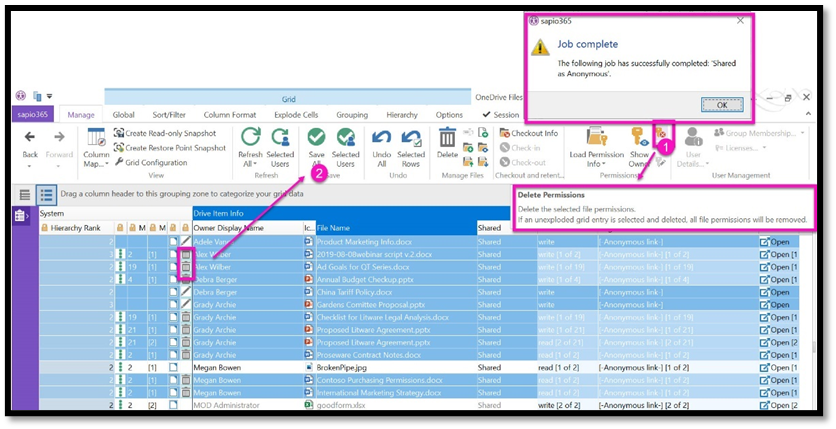
The updated View will show the SharePoint Sites that match your criteria. From within the View, you’ll be able to select and delete the anonymous links (shown in the screenshot below) while still keeping all other sharing permissions of those documents intact, so that whoever had access to them will continue to do so.