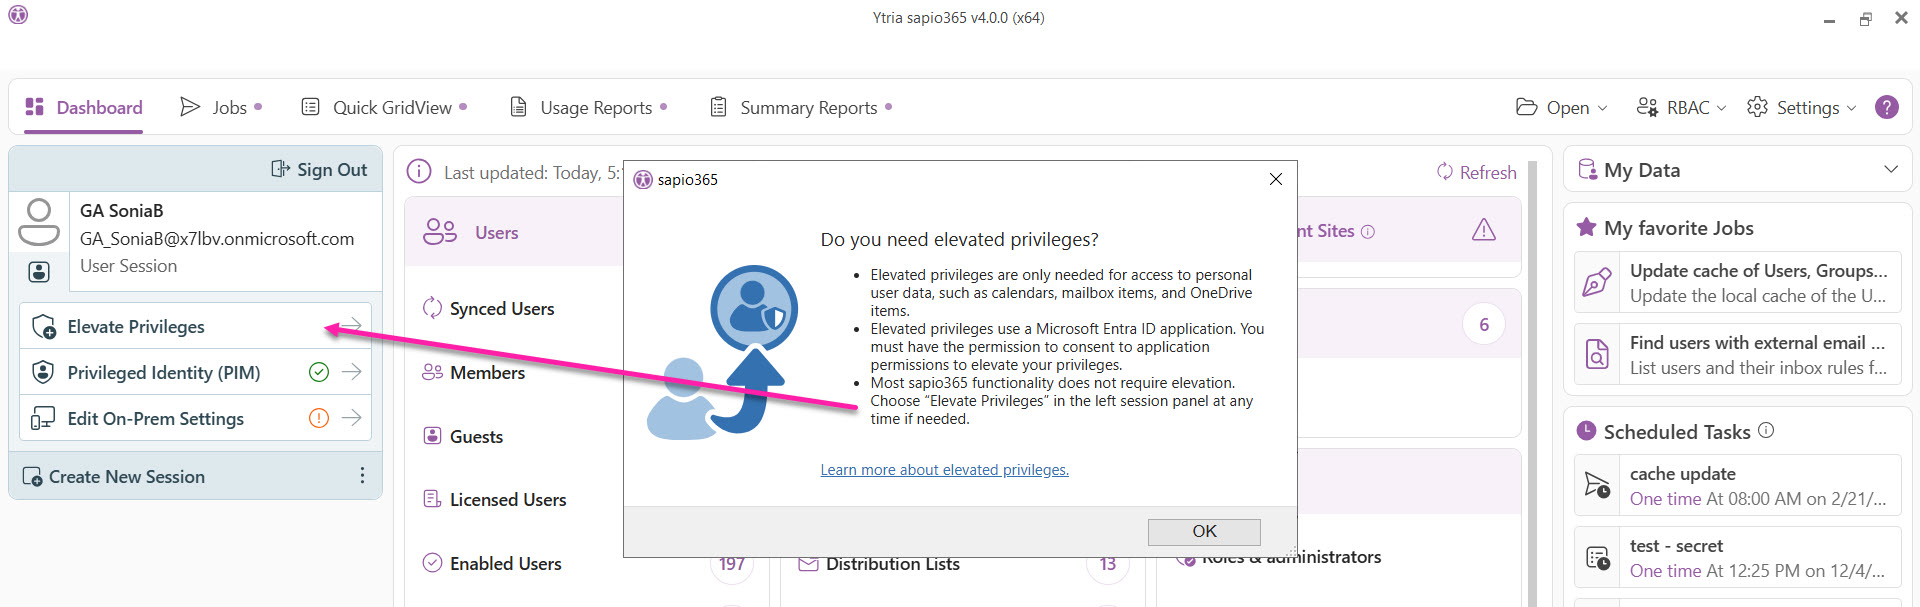
If you’re a global admin, sapio365 displays a notice when you sign in to start your session, letting you know that you can elevate your session and briefly explaining what elevated privileges involve. To proceed, simply click the Elevate Privileges button in the left panel.
An elevated sapio365 session differs from a standard User session in two key ways. First, the registered application used for an elevated session does not require an interactive user sign-in. Second, while a regular User session uses a Ytria-provided application, an elevated session requires you to use a registered application in your own Entra tenant, configured with specific Microsoft Graph permission scopes and roles.
Requirements to elevate a sapio365 session
-
You must be a global admin or be assigned the sapio365 access role Can elevate a session.
-
Your tenant must allow creating a registered application that uses a client secret for authentication.
-
You must grant admin consent to the permissions required by this registered application.
How to elevate your sapio365 session
'CredentialTypeNotAllowedAsPerAppPolicy' error
If you encounter this error when creating a registered application, it may be caused by the Baseline security mode policy “Block new password credentials in apps.” Click here to troubleshoot.
Click Elevate Privileges and follow the prompts to automatically create a registered app from sapio365.
See step-by-step instructions below.
How to elevate privileges via sapio365 (steps)
-
Click Elevate Privileges.
-
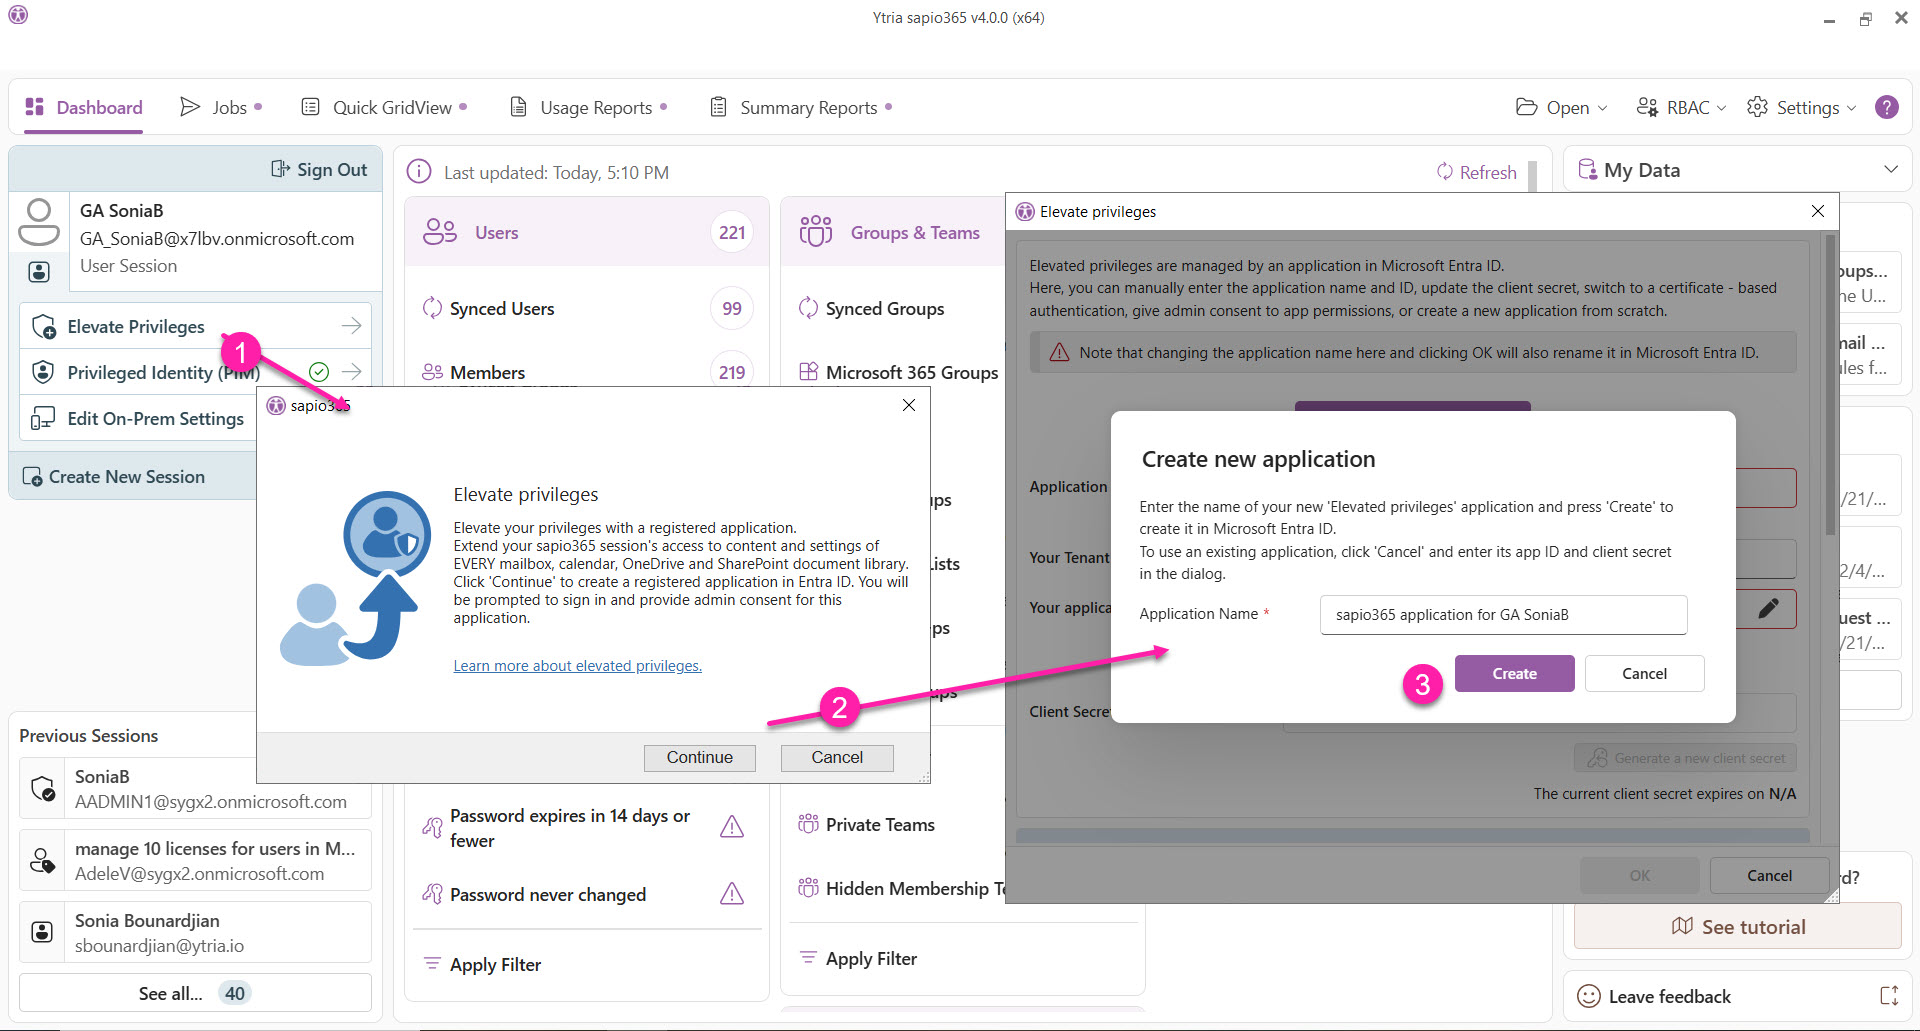
Click Continue.
-
Click Create. The name of the signed-in user will be automatically added to the name of the new registered application being created.
-
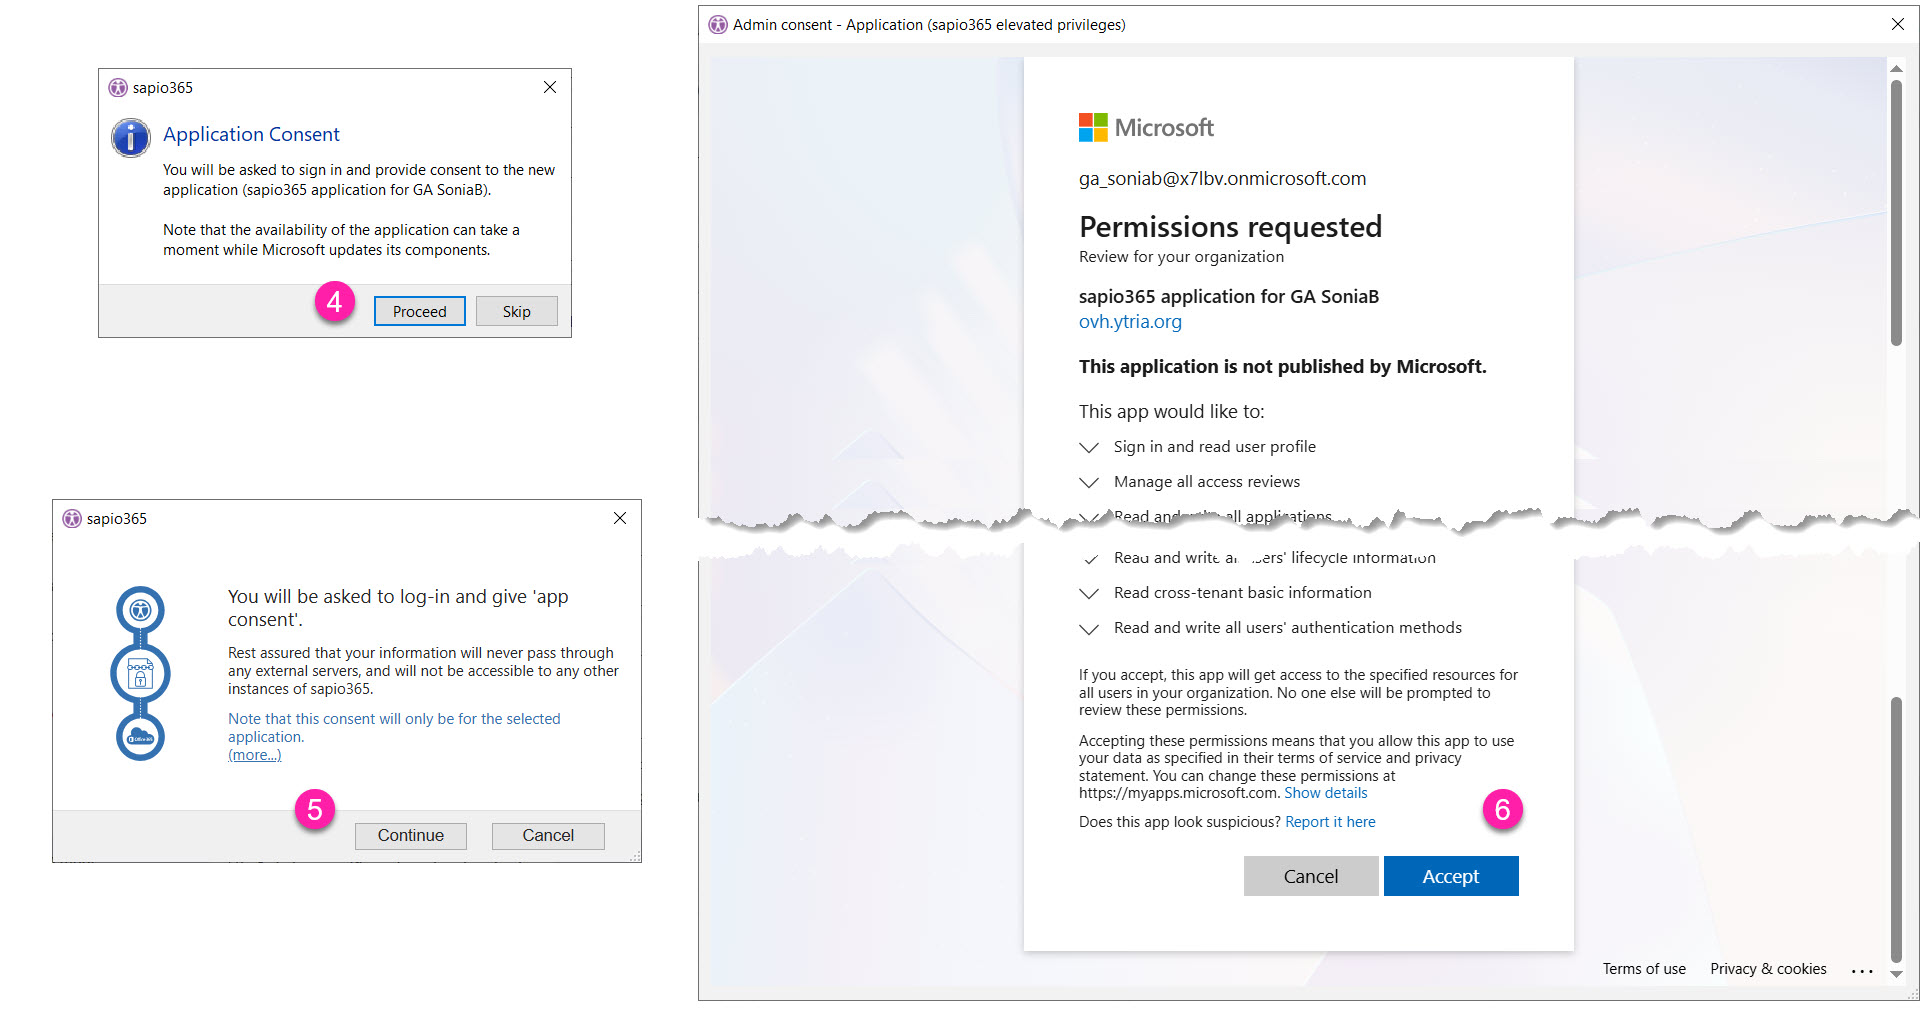
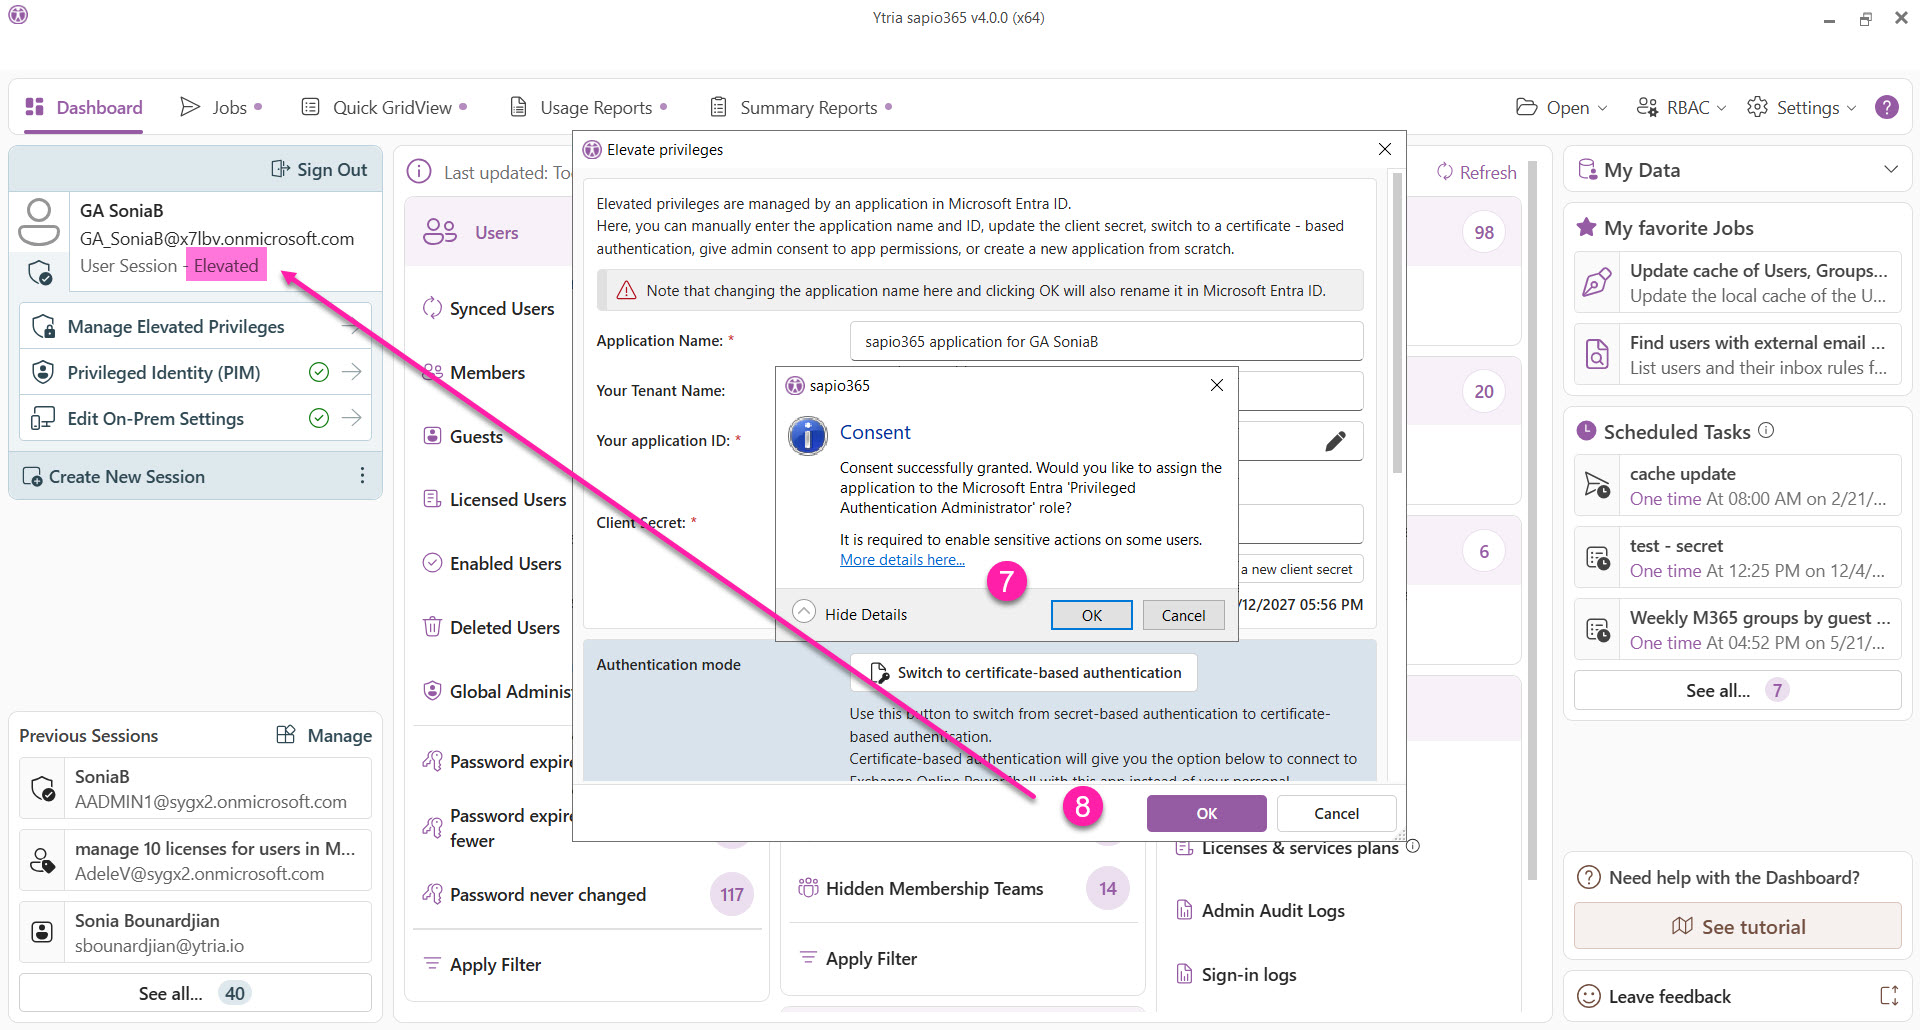
Click Proceed to consent to the permissions of the new application.
-
Click Continue, log in with your global admin account and see the list of permissions.
-
Click Accept to give admin consent to the list of permissions.
-
Click OK in the (successful) Consent message box.
Certificate-based authentication
At this point, you can switch from secret-based authentication to certificate-based authentication.
The benefits:
-
No more prompts to sign-in for PowerShell-based actions.
-
You’ll be able to schedule tasks that require PowerShell.
-
Click OK to exit the application dialog.
What happens when you elevate your session
-
A dedicated registered application is created in Entra, and you’ll need to grant consent to its permissions.
-
Most actions made in Entra with an elevated sapio365 session are logged as the registered application.
A registered application is created when you:
-
Elevate a User session.
-
Create sapio365 RBAC credentials (see specific details in the sapio365 RBAC section).
For all three session types:
-
Most actions performed with an elevated sapio365 session are logged in Microsoft Entra ID as being executed by the sapio365 registered application (service principal).
Control and liability
Since there is no "user" signed in during a session with elevated privileges, there are real-life security implications that you should be aware of when setting up your application permissions.
Limit permissions of the “elevation application”
While sapio365 lets you automatically create and register the application yourself, you can modify the permission scopes for the application even after admin consent has been given. The permission scopes shown in this document represent the maximum access potential. You can decide for yourself any limits you'd like to place on your elevated session by removing permissions. You can create and register multiple applications, all with different permission profiles.
Application password/secret
Although the newly created password can be retrieved right after the creation of a registered application, it is not necessary to note it since you can reset it at any time from your sapio365 session or from Entra (registered applications).
Most actions in an elevated sapio365 session are executed by the registered application
To elevate a session, sapio365 will let you create an “elevation application” with “application type” permissions. Before sapio365 version 2.1.10, “delegated type” permissions from an elevated session were used to perform the majority of actions in sapio365. The “elevation application” was mainly used to handle users' mailbox and OneDrive content.
-
sapio365 2.1.10
With the release of 2.1.10, sapio365 now uses the “elevation application” to perform the majority of the actions. The “delegated type” permissions will only be used for some specific actions related to group management. This will ensure that elevating your session will effectively extend your capabilities.
-
sapio365 2.2.0
The 2.2.0 release takes into account deprecated Microsoft Graph API permissions. This resulted that some sensitive actions on certain users (ex. global admins) require the sapio365 registered application to have the 'Privileged Authentication Administrator' role assigned. During the app creation process you will have the option to assign the role to the app. This role assignment is necessary for the maximum functionality of sapio365 but it is not mandatory. See the full list of sensitive actions here.
(Optional) Manually create application at the v2 Entra (Azure Active Directory) Endpoint
You have the option to manually create a registered application in Entra to elevate a sapio365 session. You'll need a key pair for proper authentication: an app ID that will identify the application and the password provided (see Step 8) which will authenticate the application.
Step-by-step instructions
Starting from version 2.1.10, an elevated session in sapio365 requires the assigned role ‘Privileged Authentication Administrator' for several features equivalent to ‘sensitive actions’. Ex. Resetting a global admin’s password, revoking session access, etc.. This assignment can be done from sapio365 once the application is created to elevate a session.
More details about sensitive actions can be found on this Microsoft documentation page.
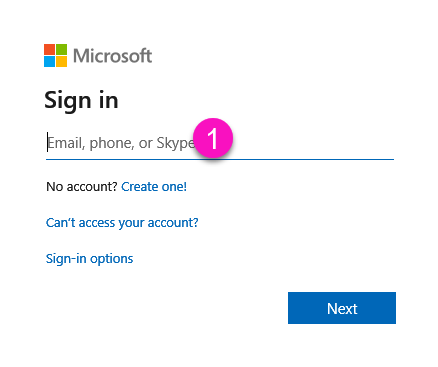
1 - Go to the Azure portal login page and sign in with your credentials.
2 - Create a new registered application.
3 - Name your application.
Redirect URI (optional): If you choose not to give consent during the registration process (Step 7) and to give consent directly in sapio365, you will need to enter the URI below.
https://localhost:33366
This is the default address used by sapio365 to complete the consent process. If you need to enter a different address, you may.
4 - Register it.

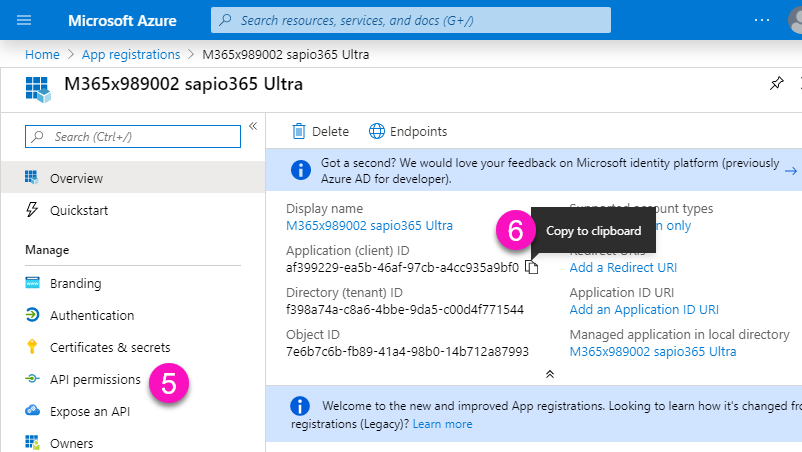
5 - Copy and save the Application ID to enter in sapio365.
6 - Add permissions.
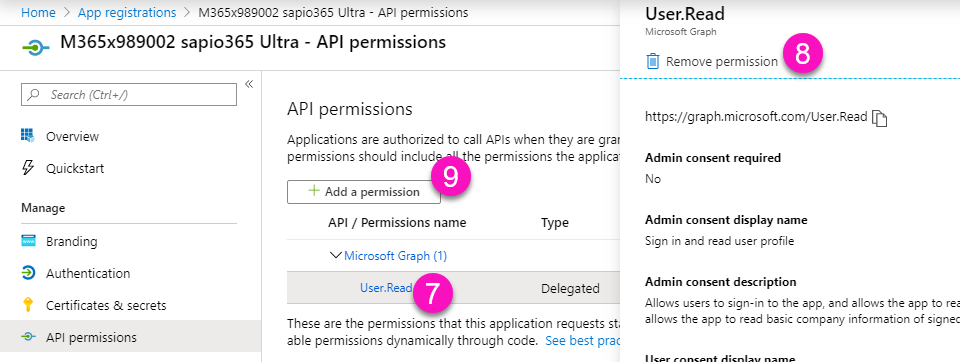
7 - Click on “User.Read” permission.
8 - Remove this permission.
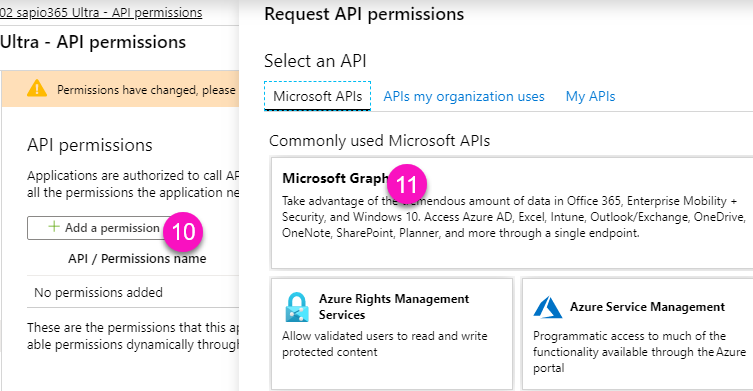
9 - Click on “Add permission”.
10 - Click on Add permissions.
11 - Click on “Microsoft Graph”.
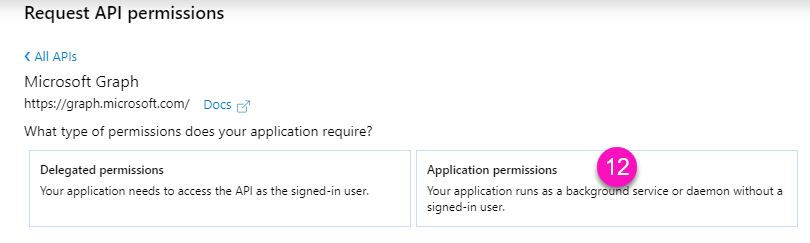
12 - Click on “Application permissions”.
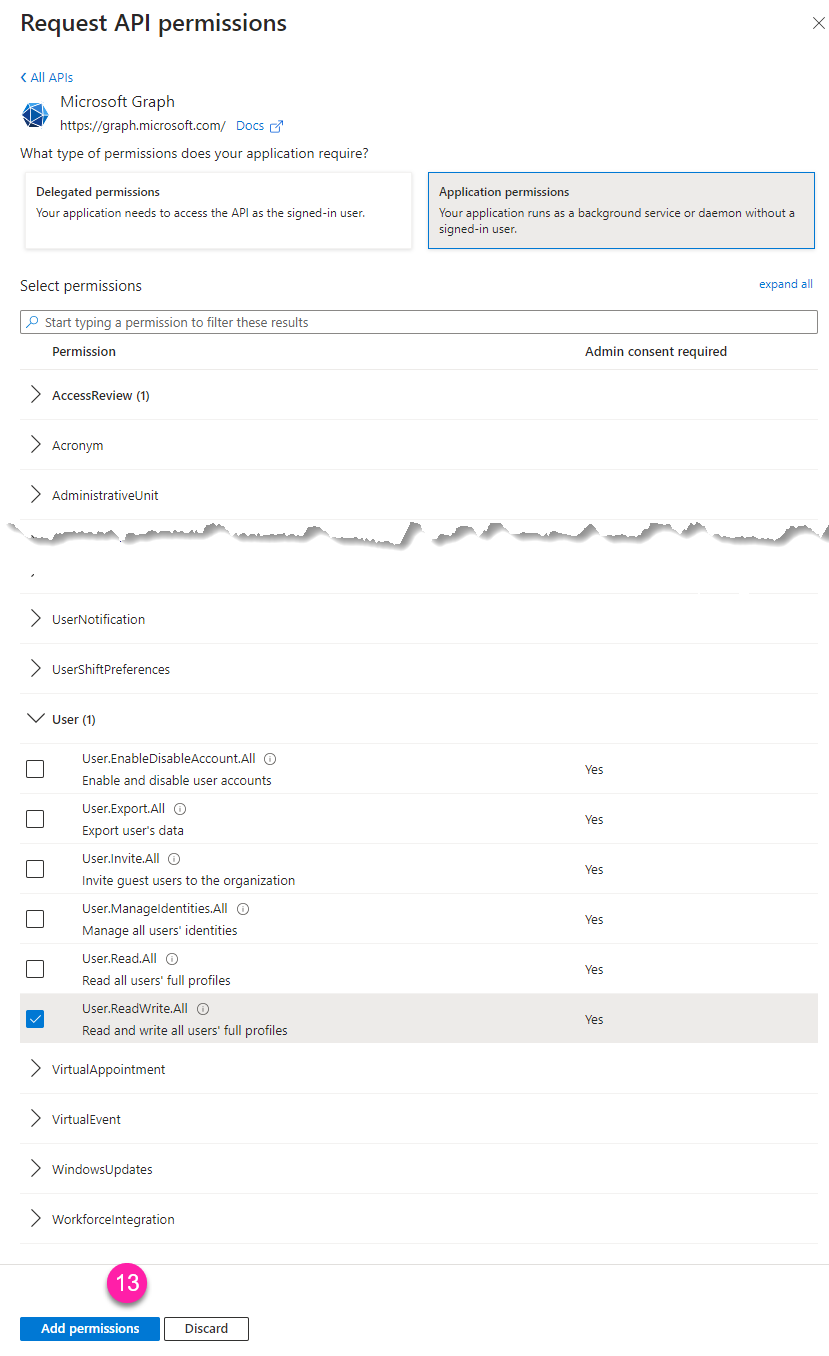
13 - Select permissions.
In each category, check the required permissions (see the recommended list below) and when finished, click on Add permissions.
You have full flexibility to add whichever permissions you choose. The following list of permission scopes is simply a suggestion. To learn more about these permission scopes, see the Active Directory v.2 Permission Scope Reference Guide.
For a complete experience, the following permission scopes should be assigned.
|
Permission |
Description |
|---|---|
|
AccessReview.ReadWrite.All |
Manage all access reviews |
|
Application.ReadWrite.All |
Read and write all applications |
|
AuditLog.Read.All |
Read all audit log data |
|
Calendars.ReadWrite |
Read and write calendars in all mailboxes |
|
Channel.Create |
Create channels |
|
Channel.Delete.All |
Delete channels |
|
ChannelMember.ReadWrite.All |
Add and remove members from all channels |
|
ChannelMessage.Read.All |
Read all channel messages |
|
ChannelSettings.ReadWrite.All |
Read and write the names, descriptions, and settings of all channels |
|
Chat.ReadWrite.All |
Read and write all chat messages |
|
Contacts.ReadWrite |
Read and write contacts in all mailboxes |
|
Device.ReadWrite.All |
Read and write devices |
|
Directory.ReadWrite.All |
Read and write directory data |
|
Files.ReadWrite.All |
Read and write files in all site collections |
|
Group.ReadWrite.All |
Read and write all groups |
|
Mail.ReadWrite |
Read and write mail in all mailboxes |
|
Mail.Send |
Send mail as any user |
|
MailboxSettings.ReadWrite |
Read and write all user mailbox settings |
|
Member.Read.Hidden |
Read all hidden memberships |
|
Notes.ReadWrite.All |
Read and write all OneNote notebooks |
|
People.Read.All |
Read all users' relevant people lists |
|
ProgramControl.ReadWrite.All |
Manage all programs |
|
Reports.Read.All |
Read all usage reports |
|
RoleManagement.ReadWrite.Directory |
Read and write all directory RBAC settings |
|
SecurityActions.ReadWrite.All |
Read and update your organization's security actions |
|
SecurityEvents.ReadWrite.All |
Read and update your organization’s security events |
|
Sites.FullControl.All |
Have full control of all site collections |
|
Team.Create |
Create teams |
|
TeamSettings.ReadWrite.All |
Read and change all teams' settings |
|
User-LifeCycleInfo.ReadWrite.All |
Read and write all users' lifecycle information |
|
User.Read |
Sign in and read user profile |
|
User.ReadWrite.All |
Read and write all users' full profiles |
If you have opted to consent through the application, skip the next steps and go to step 17.
14 - Click “Grant admin consent for ….”
15 - Confirm the consent request.
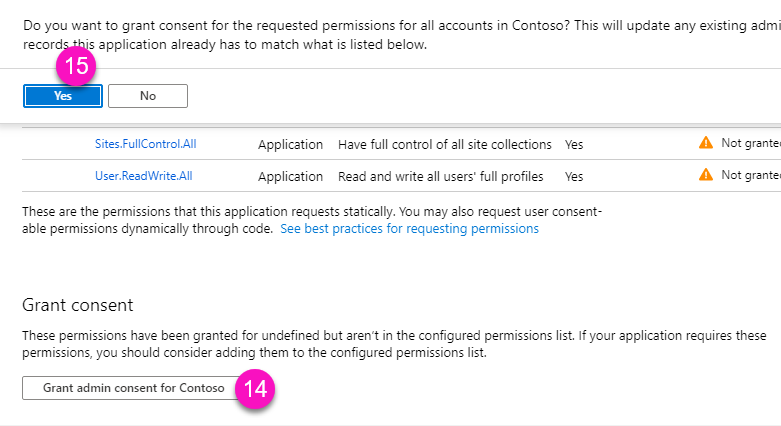
16 - You will see a confirmation.

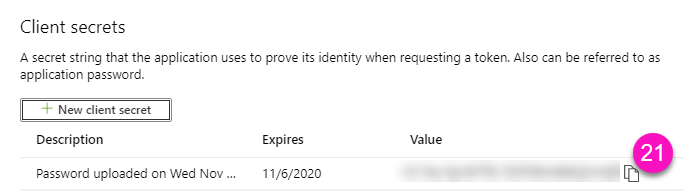
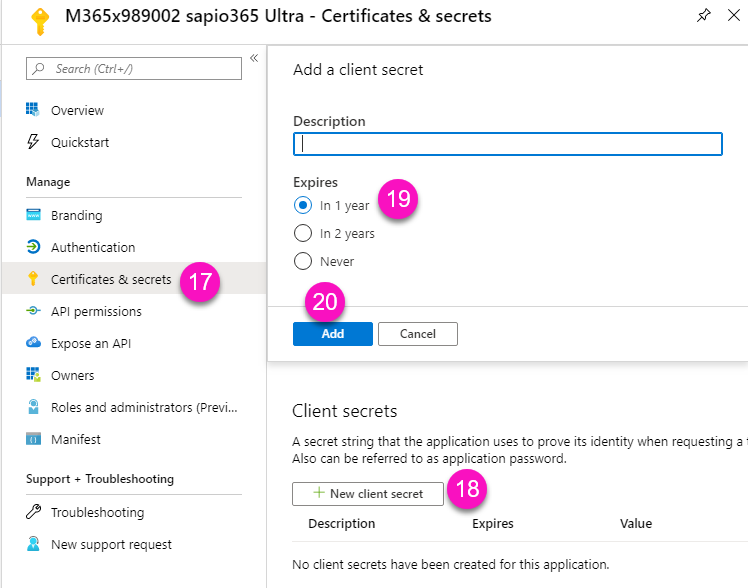
17 - Go to “Certificates & secrets”.
18 - Click on “New client secret”.
19 - Choose an expiration period.
20 - Click “Add”.
21 - Copy and save the new client secret to use in sapio365.
IMPORTANT: This is the only time you will see your password! sapio365 will not let you retrieve it. Take note of it now and keep it safe.