In order to give RBAC delegates access to a tenant and to an on-premises Active Directory (if hybrid tenant), you’ll need to set up valid credentials for a role with the following steps.
-
Create a dedicated registered application and optionally, a service account.
-
The registered application in your Entra created automatically by sapio365 includes the highest permissions for maximum access. You can restrict this application by removing permissions that you may deem unnecessary for the roles that you will use with this credential set.
-
Give consent to the application’s permissions.
-
(Optional) Set a shared cache on a Microsoft SQL server, MariaDB or a local folder.
You can also:
Create credentials
Multi-tenant management
If you want to manage more than one tenant through sapio365 RBAC roles, create a set of credentials to access each environment.
Exempt service account from MFA
You may encounter an MFA-related error when you finish creating a set of credentials because the service account that was created must not subject to an MFA policy. Once you’ve exempted the account, try again.
From the Dashboard, choose RBAC from the upper right, then Configuration, to set up the credentials to use for the roles you will create.
-
Click on the the ‘Credentials’ tab,
-
Click on the ‘Create’ button.
-
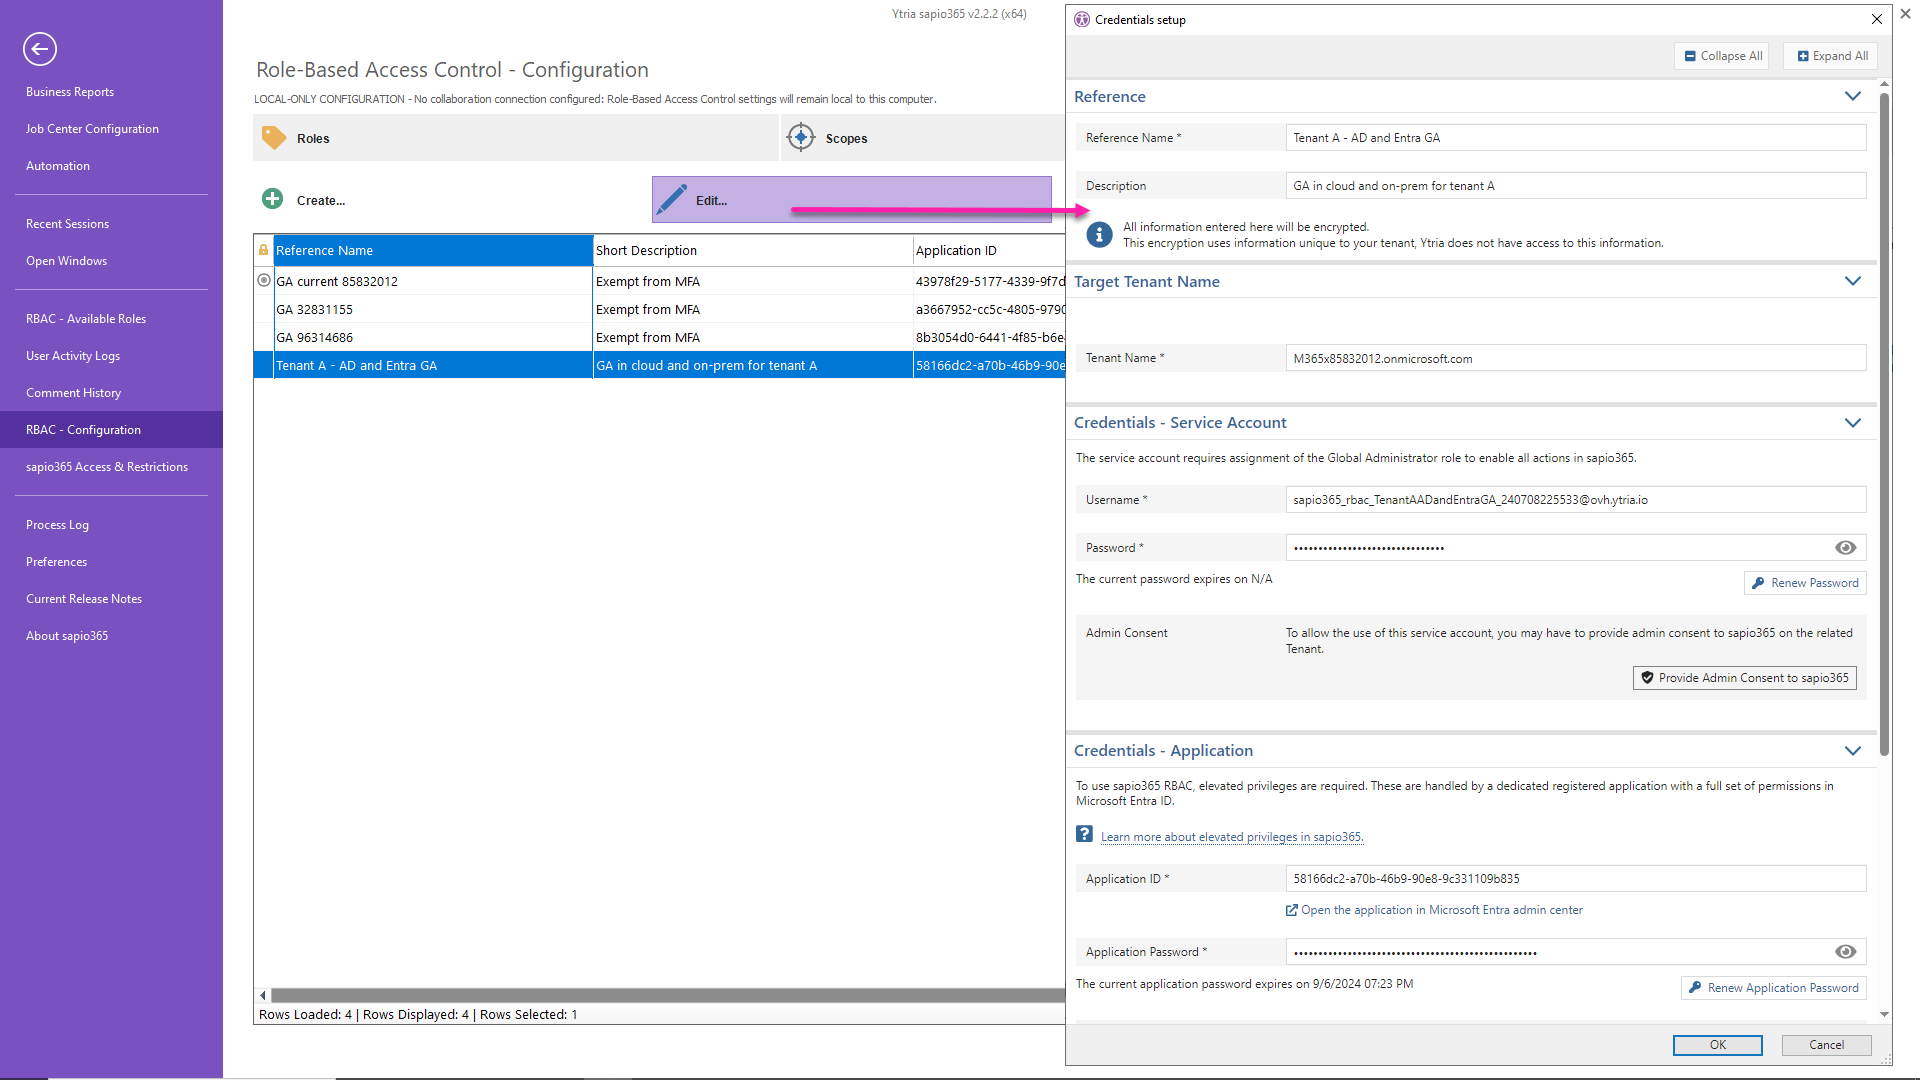
Enter a unique name and description for the credentials you’re setting up. If you’re using sapio365 RBAC to manage several tenants, you’ll need to do this for each tenant.
The name you enter has a 256 character limit and will be used as a reference in sapio365.
-
Click on ‘Create New Service Account & Application’ to automatically create a new, RBAC-dedicated user account and a new registered application in Entra.
-
Select from the current session tenant or another tenant. If you have Partner Access with admin rights, you’ll see a third option “Customer”.
-
If you select anything besides the current tenant, ex. “Other”, you’ll be asked to authenticate and give consent to the enterprise application “Ytria sapio365 - with Admin Consent” for that tenant.
-
Although a sapio365 RBAC credential can be that of an existing user account, we strongly suggest to create a dedicated service account for sapio365 RBAC.
Note that the new service account does not require assignment of any Microsoft 365 license for sapio365 RBAC.

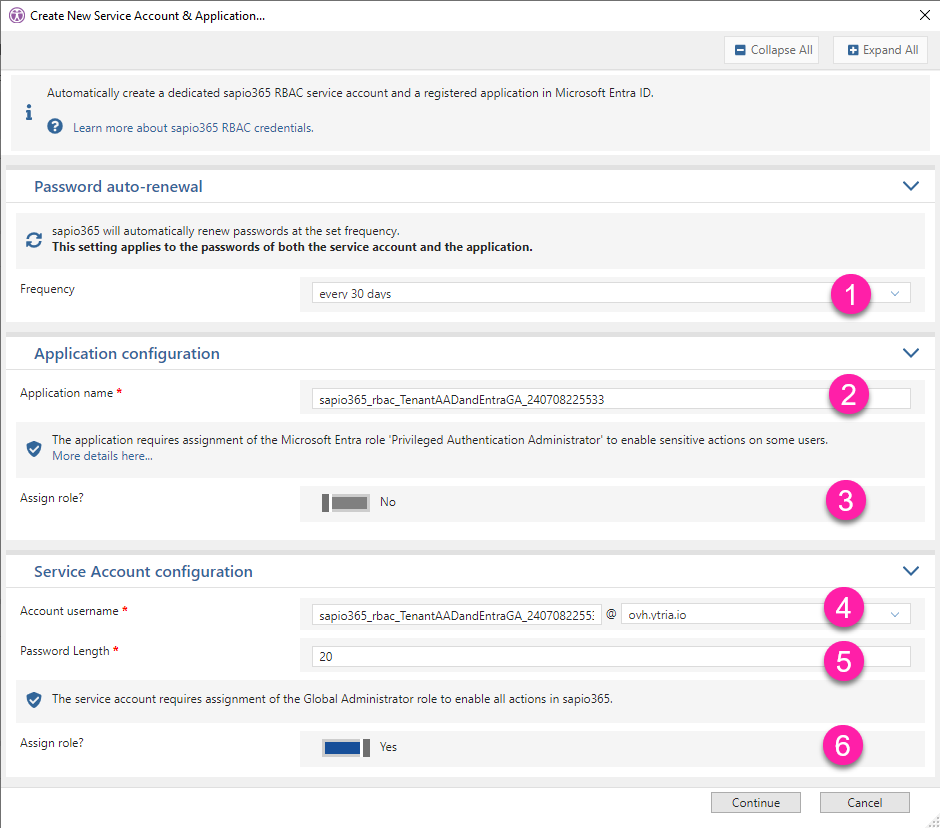
1 - Create a service account and registered application
After choosing the tenant, you will be presented with several options regarding the new service account and the registered application:
-
Frequency: Set password auto-renewal frequency (we recommend every 30 days - set by default).
-
Application name: This is the name of the new registered application in Entra. You can change it.
-
Assign Role to application: Certain “sensitive” actions by applications in Entra require a ‘Privileged Administrator Authenticator’ role. For example, resetting a password on a global admin. If your sapio365 RBAC roles using this set of credentials include such actions, you must assign this role. You can always assign this role at a later time.
-
Account username: This is the name of the new service account. You can change it.
Exempt from Multi-Factor Authentication
Make sure to add this service account to your MFA policy exception list.
If you have any application restrictions set, make sure to add this service account to the group or approved list of users who can use the enterprise application “Ytria sapio365 - with Admin Consent”.
-
Password Length: Define the password length of the service account.
-
Assign Role to service account: Assign the Global Admin role to the service account.
Assign Global Admin role highly recommended
Although this is optional, several sapio365 features will not work without this role.
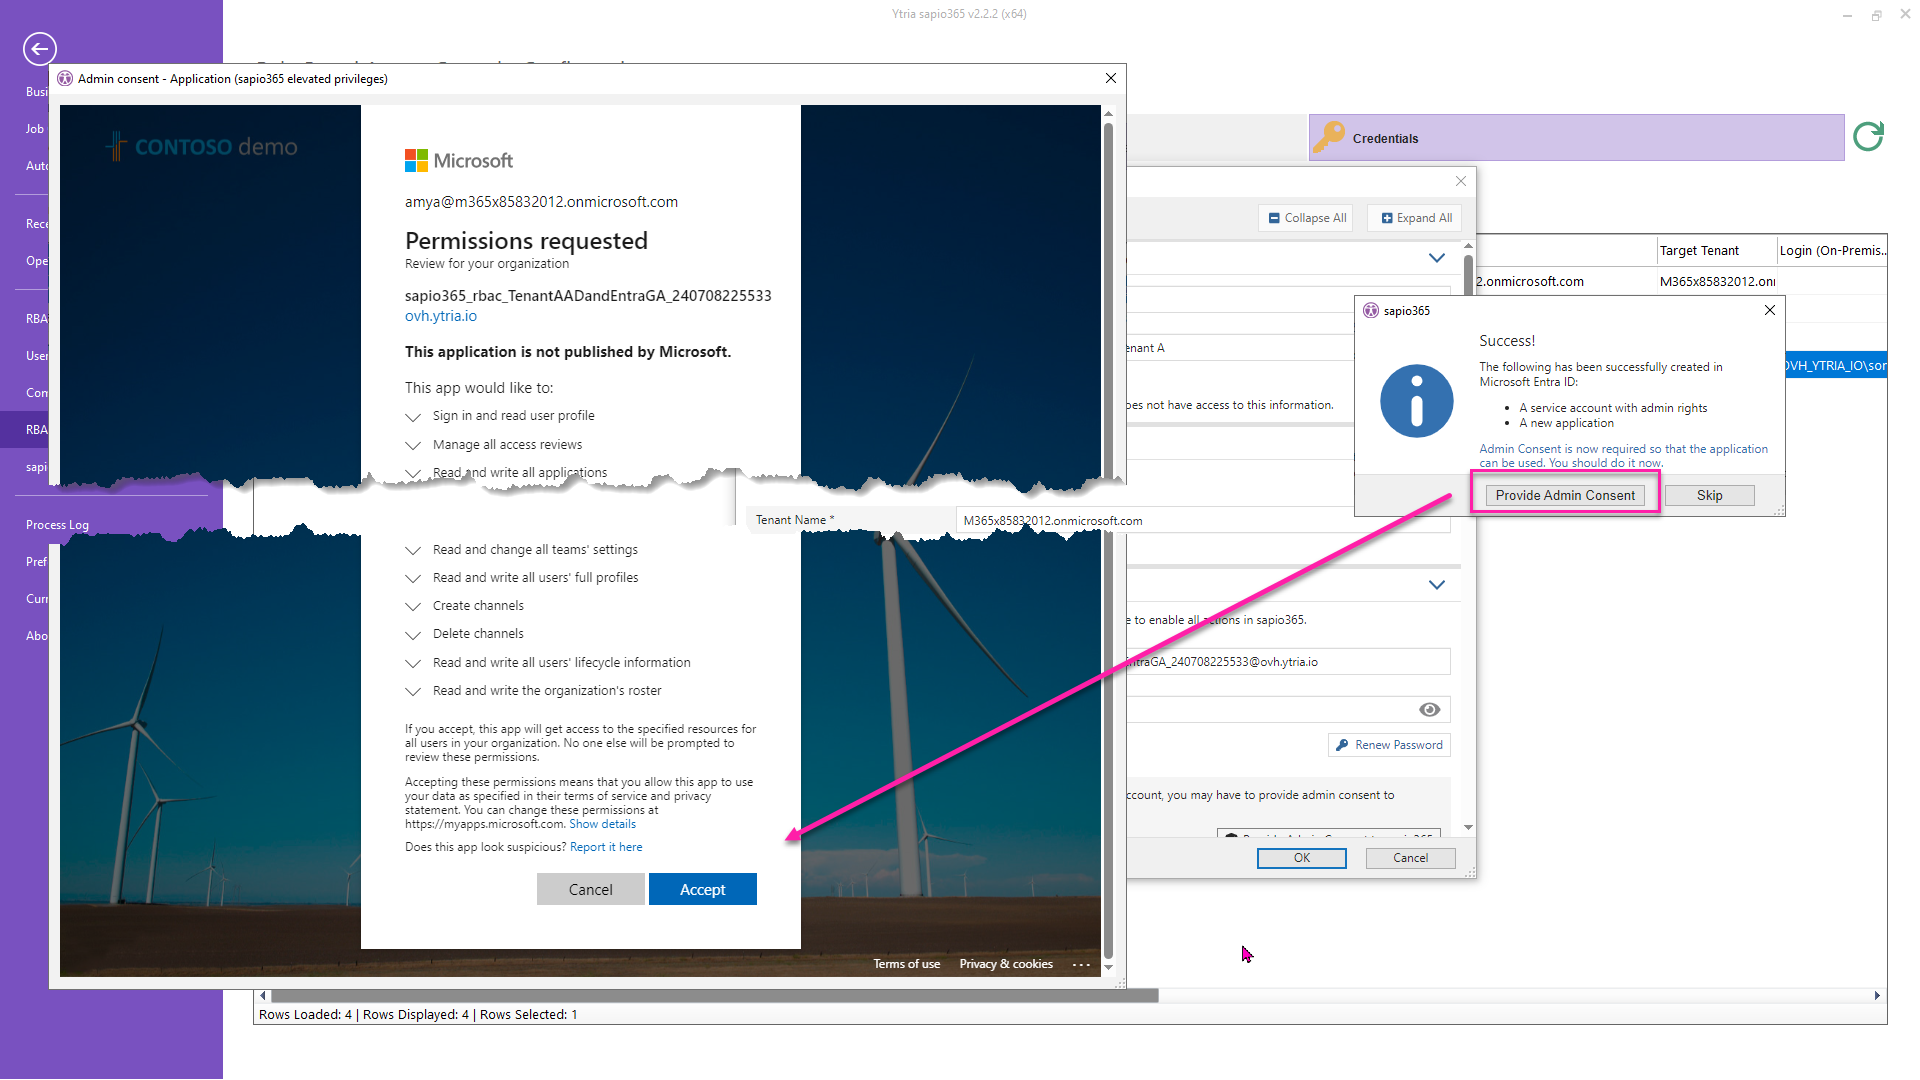
2 - Give consent
After the creation of the service account and the registered application, you will be asked to give consent to its permissions. You must be a global admin to do so.
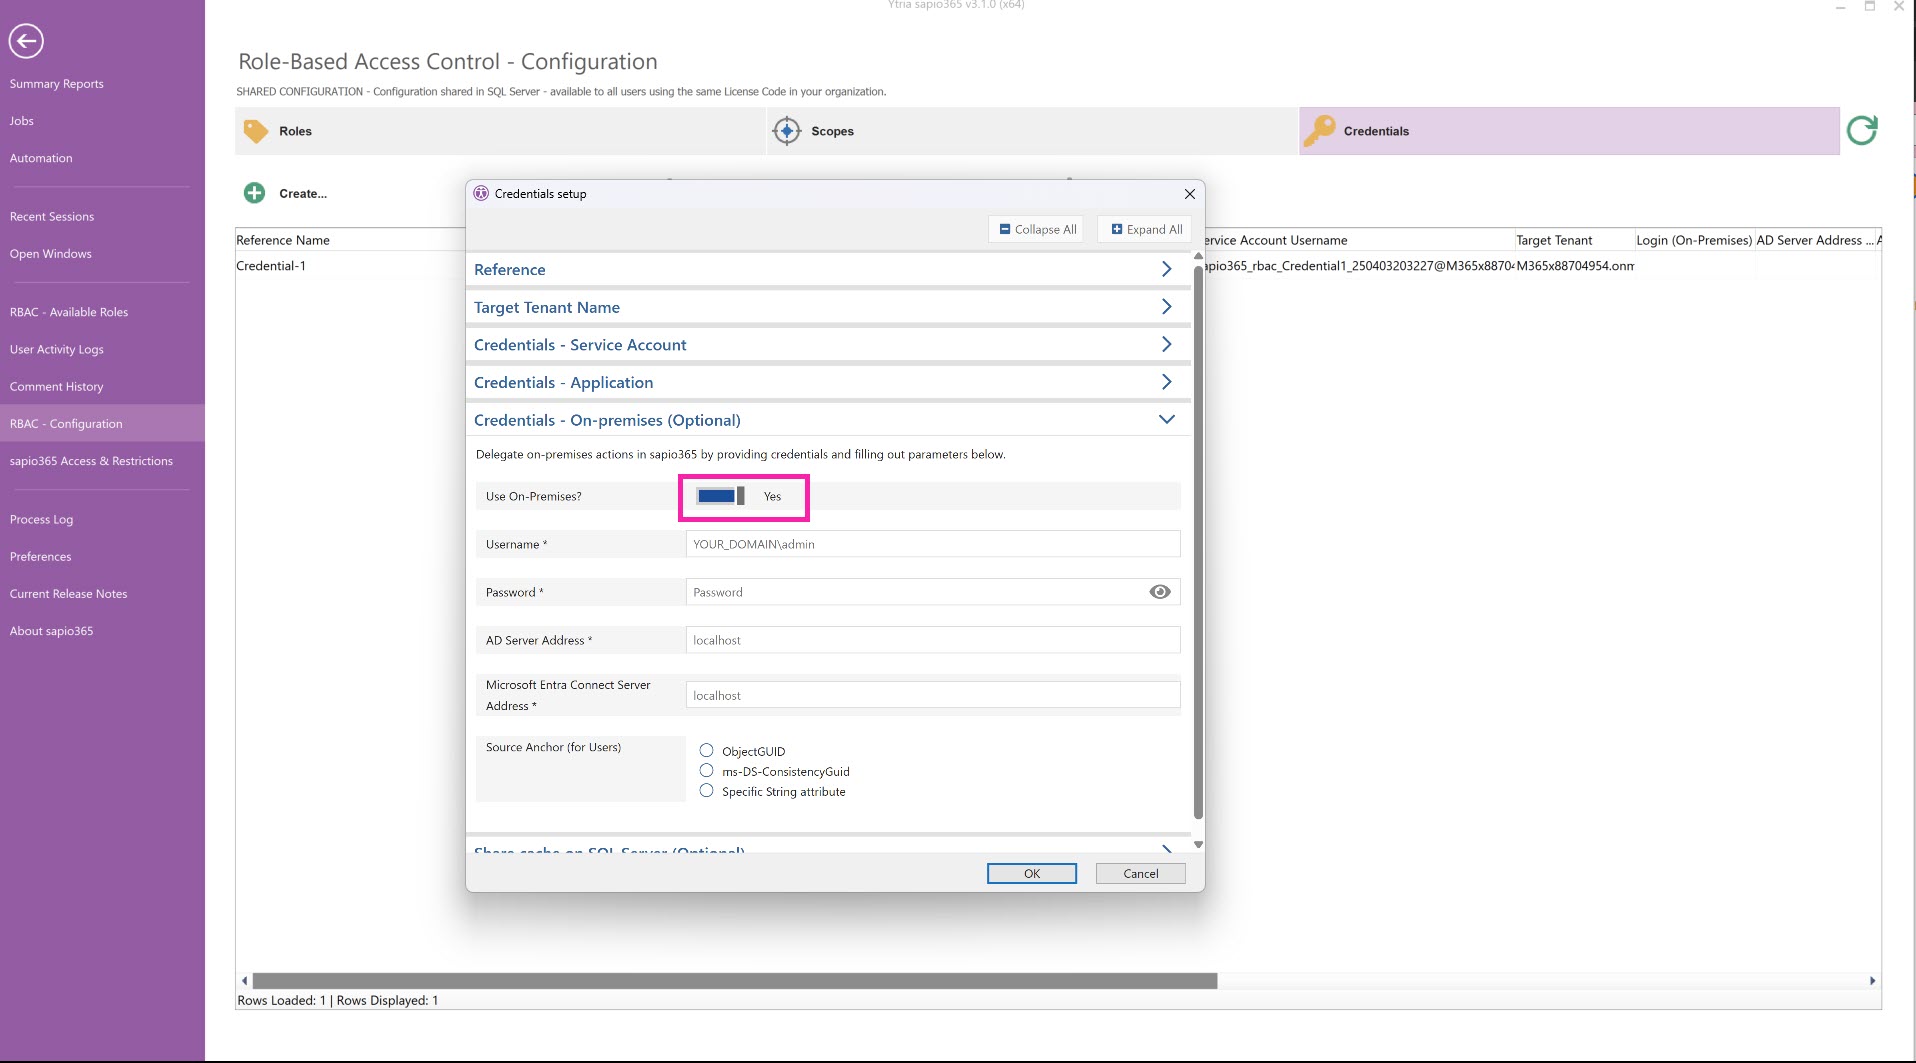
3 - (Optional) Set on-premises credentials
Add connection information for accessing the local on-premises Active Directory (AD) connected to the tenant the same way as you would connect to on-prem AD in a sapio365 session. These credentials will be used to for actions in sapio365 based on chosen on-premises sapio365 RBAC permissions.
Make sure to toggle ‘Use On-Premises?’ to 'Yes' before clicking OK.
The Source Anchor option should match whatever you have configured in Entra Connect.
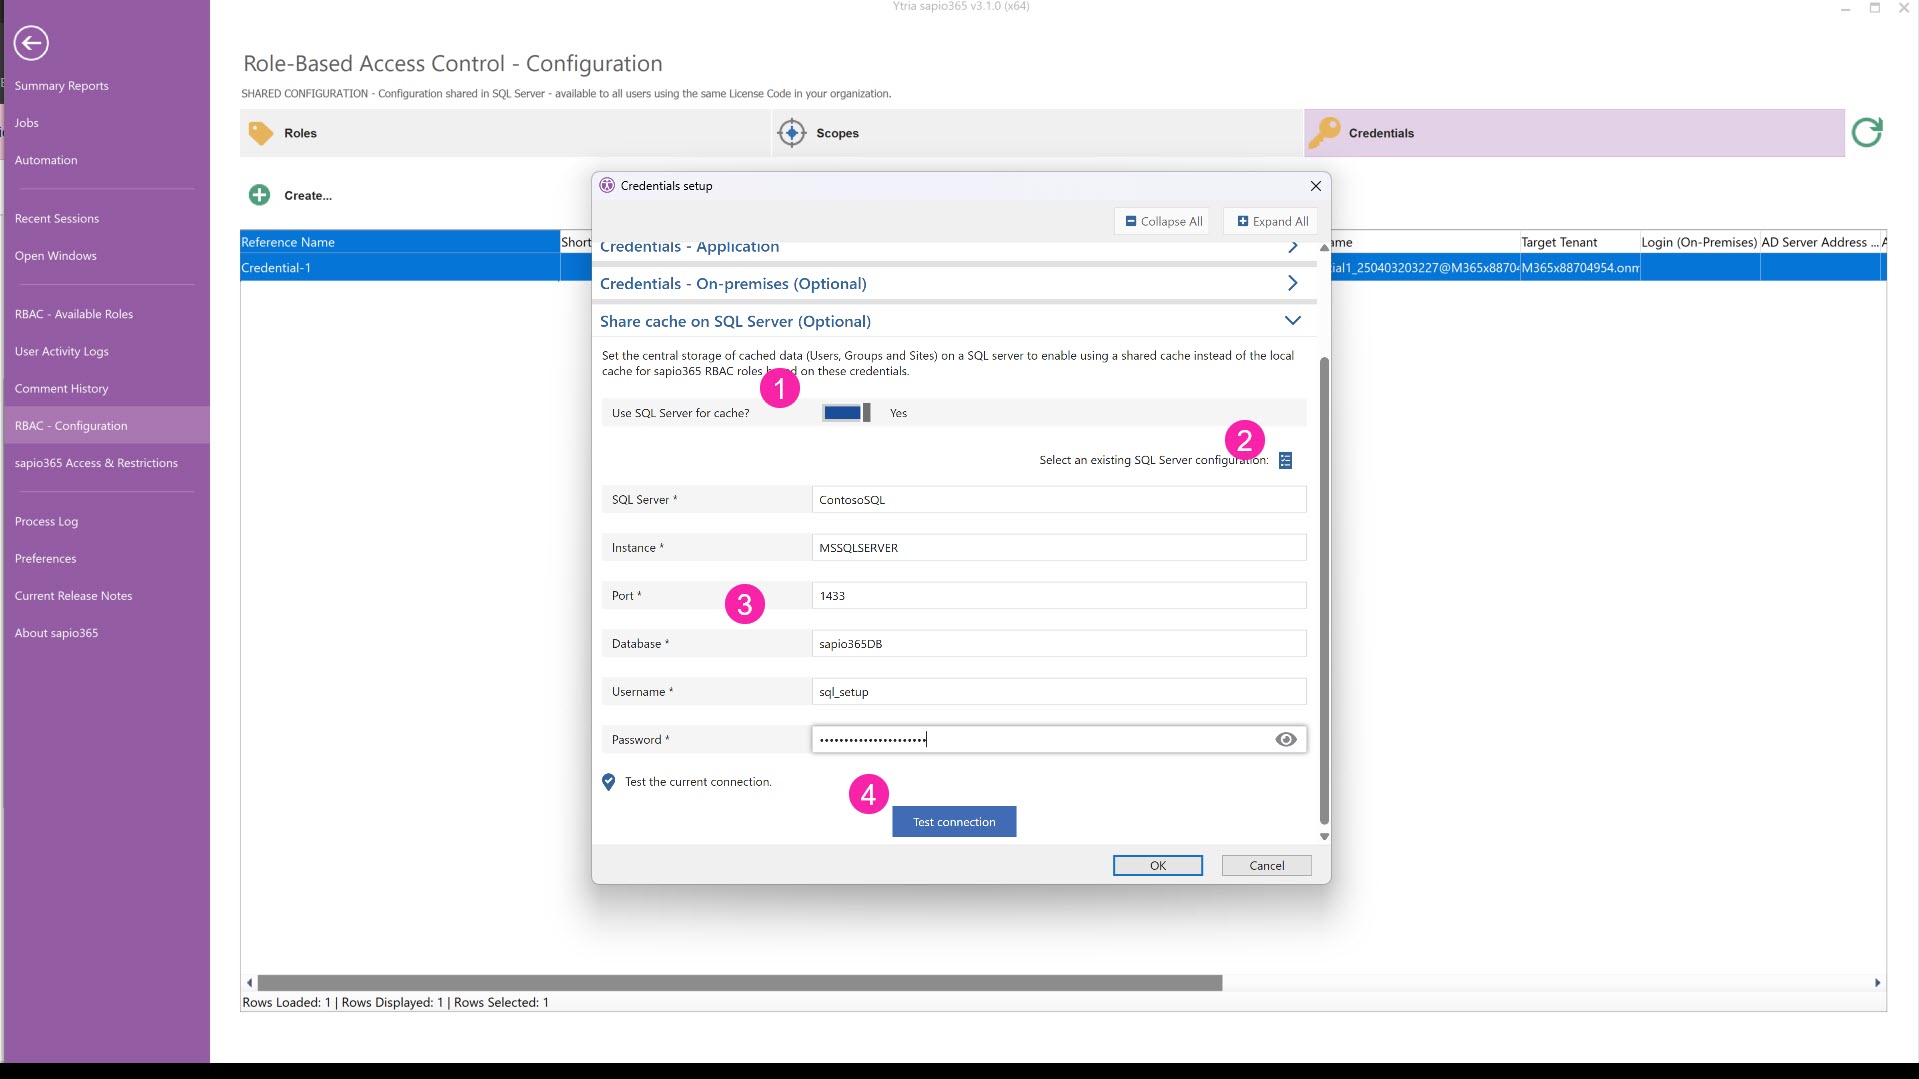
4 - (Optional) Set a shared cache on a SQL server
This option allows users with roles based on this particular set of credentials to share the same data cache of Users, Groups, Sites and Service Principals by setting up cached data storage in a Microsoft SQL database in your local network or in the Microsoft cloud Learn about requirements here.
Skip cache sharing if you manage small environments
A shared cache is only ideal if the target tenant has a large number of users, groups, sites or service principals.
This allows users with a role to:
-
load data faster
-
access centralized data (easier to keep up-to-date)
All roles based on this set of credentials give the same access to the full list of users, groups, sites or service principals, and their properties.
If you want to centralize the cache used by sapio365 for your roles for a set of credentials, you can
-
Set ‘Use SQL Server’ to “Yes” or “True”.
-
(Optional) If you’ve already set parameters to connect to MS SQL in sapio365 (ex. collaboration), you can add them with this button.
-
Add parameters.
-
You can test the connection by clicking on the button.
If there is an error, check your credentials and the information you entered.
If the error persists, you can check the connection directly instead of through sapio365. There may be an issue with how how your database is setup.
Edit credentials
Click “Edit” to view or change the parameters of the set of credentials you select, including but not limited to:
-
The tenant
-
The service account
-
The registered application (via its ID)
-
Viewing the expiration of the application’s and service account’s password
-
Renewal of the application’s or service account’s password
-
Addition of a role
-
Viewing the permissions of the registered application
-
Giving consent to an application
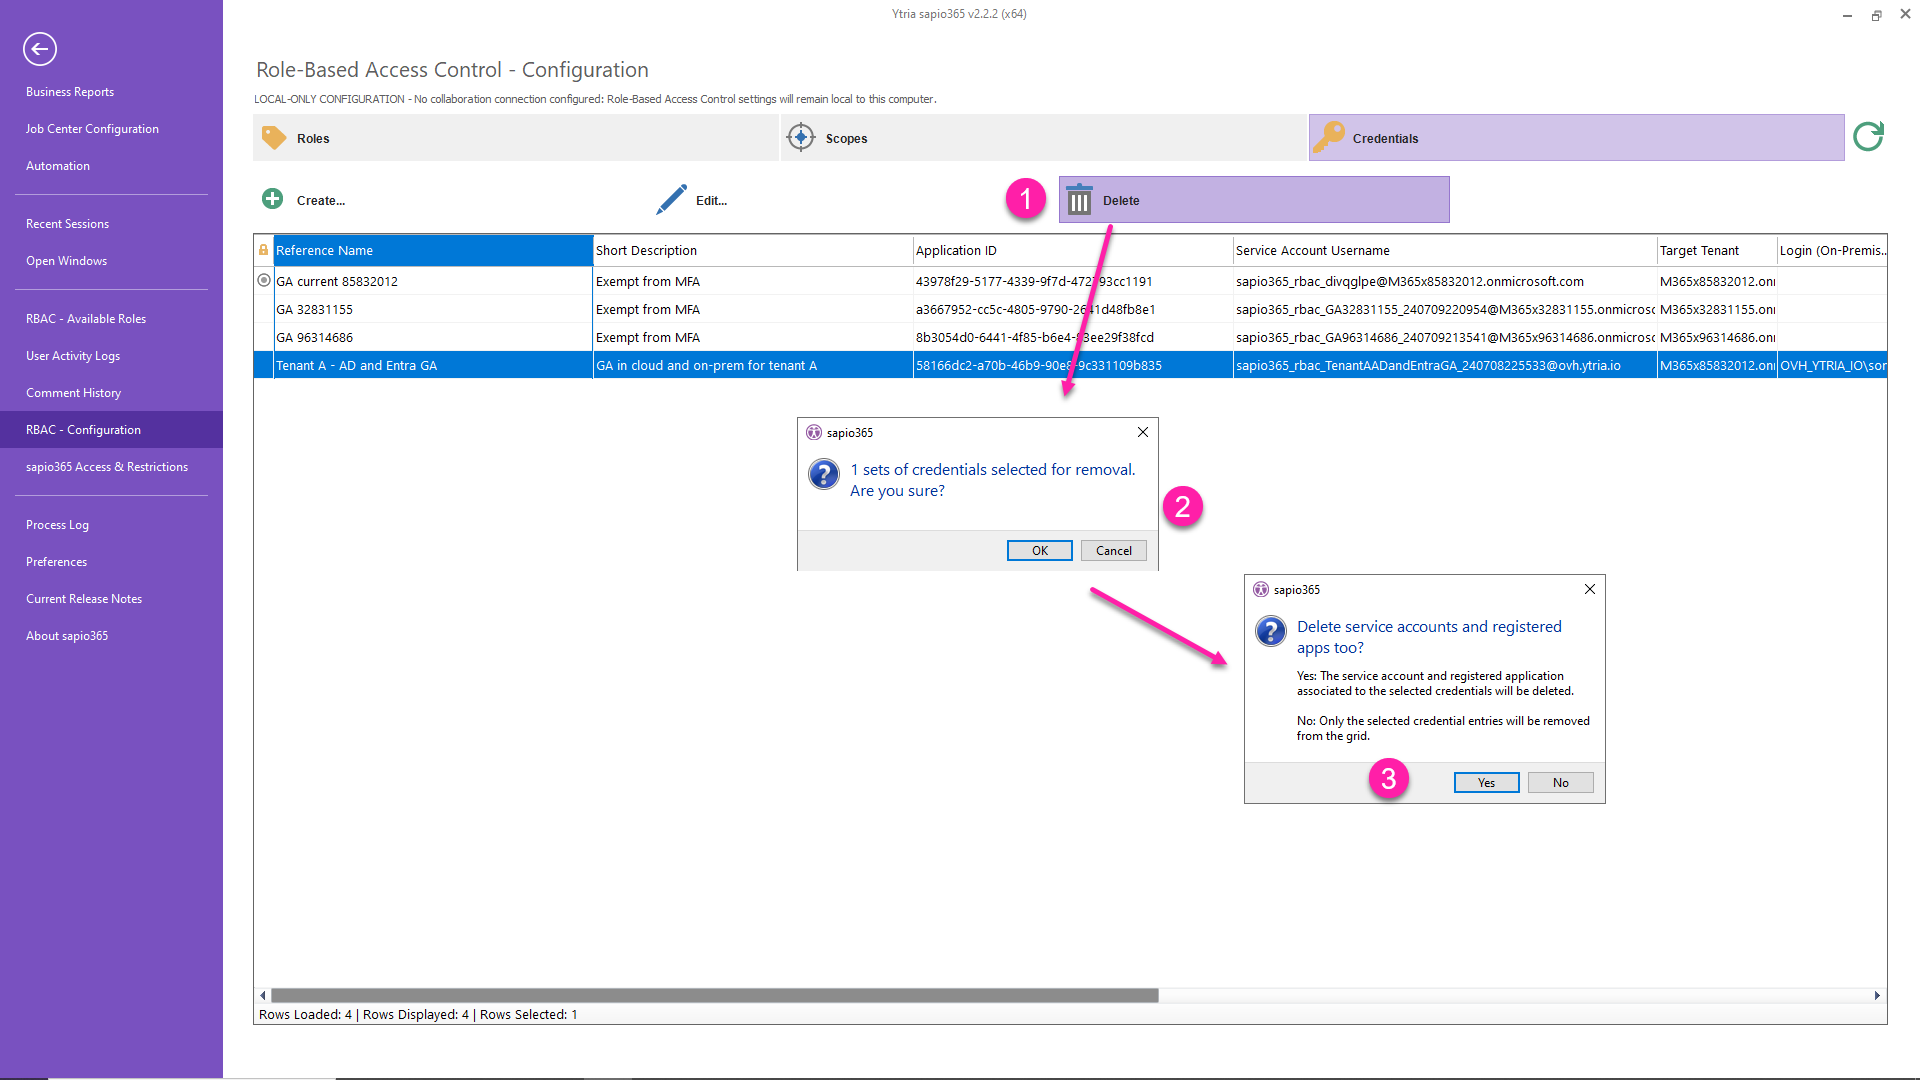
Delete credentials
-
Select one or more sets of credentials to delete them from sapio365 with the ‘Delete’ button.
You can can only delete a set of credentials if it's not in use for any sapio365 RBAC role.
-
You will be asked for confirmation to avoid mistakes.
-
Click “Yes” to delete the associated service account and registered application.
Deleting a set of credentials on another tenant from the RBAC list does not remove them from that tenant’s Entra.