
This job is available in the Users, SharePoint Sites and Personal SharePoint Sites views.
This job retrieves the User Information List for each selected site and allows you to remove users from each Site Collection. You can also add or remove users and security groups from each site’s Site Collection Administrators list, set a new primary Site Collection Administrator, check if a site is locked, and unlock it if needed.
This job uses Exchange Online PowerShell and SharePoint PowerShell.
Does not apply to subsites
Currently, the Manage user access to selected sites job can only be executed on root sites.
Job Requirements
This job uses your PowerShell credentials. To retrieve the user list or remove a user, you must have both of the following roles:
-
SharePoint Online Administrator or Global Administrator
-
Site Collection Administrator for the selected sites
If you run this job in a regular user session, the job dialog provides an option to temporarily add yourself as a site collection administrator for the selected sites so that sapio365 can query them. This option is available under Site Collection Administrator Options.
Elevated session * sapio365 RBAC role session * App session
If you run the Manage user access to selected sites job in an app-based session configured to use certificate-based authentication for Exchange Online PowerShell and SharePoint Online PowerShell, grant the Sites.FullControl.All application permission for SharePoint to the registered sapio365 application.
An Entra ID administrator must grant admin consent for this permission. You only need to complete this configuration once per registered sapio365 application.
How to run the job
-
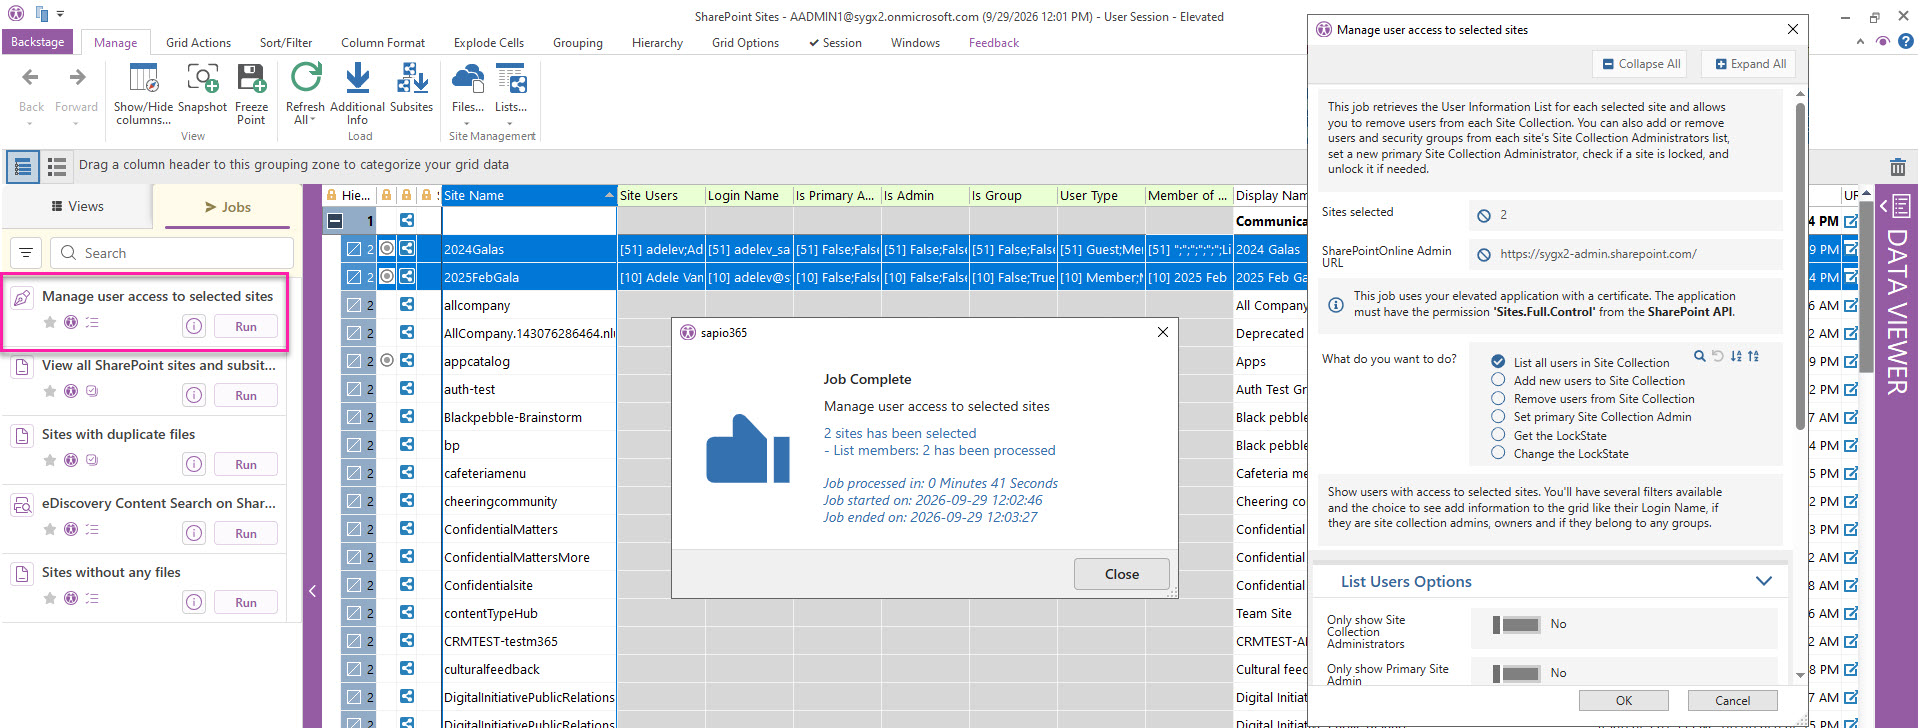
In the Users, SharePoint Sites, or Personal SharePoint Sites view, select the users (OneDrive) or sites you want to work with. Then, in the Jobs panel on the left, select Manage user access to selected sites.
-
Choose a Job Action from the table below, then configure its options, including the data and columns to add to the GridView. Expand the section for your chosen action for available options and detailed steps.
|
Job Actions |
Description |
|---|---|
|
List all users in Site Collection |
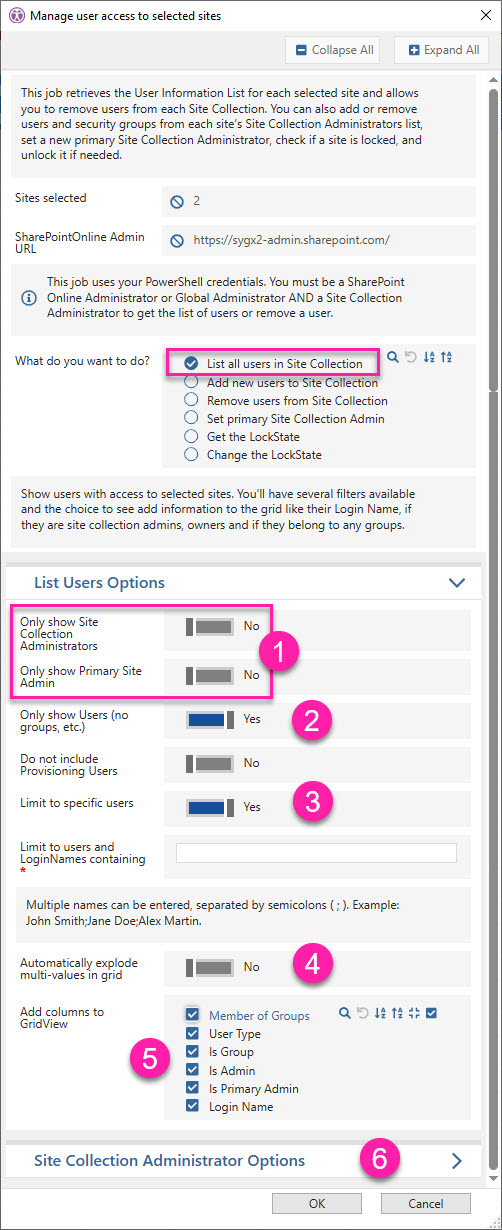
List users with access to the selected sites. Filter the results and choose which user details to add to the GridView, such as login names, administrator status, and group membership. Expand to view detailed options
A site’s User Information List can be large. Use the first three filters below to narrow the users shown in the GridView. You can combine them with the other options. Tip: Show users in separate rows If a site has a long user list, consider expanding each user and their access information into a separate row. The Automatically explode multi-values in grid option below does this for all selected sites when the job finishes. Alternatively, use View Multivalue to inspect a site’s user list in a mini-grid.
|
|
Add new users to Site Collection |
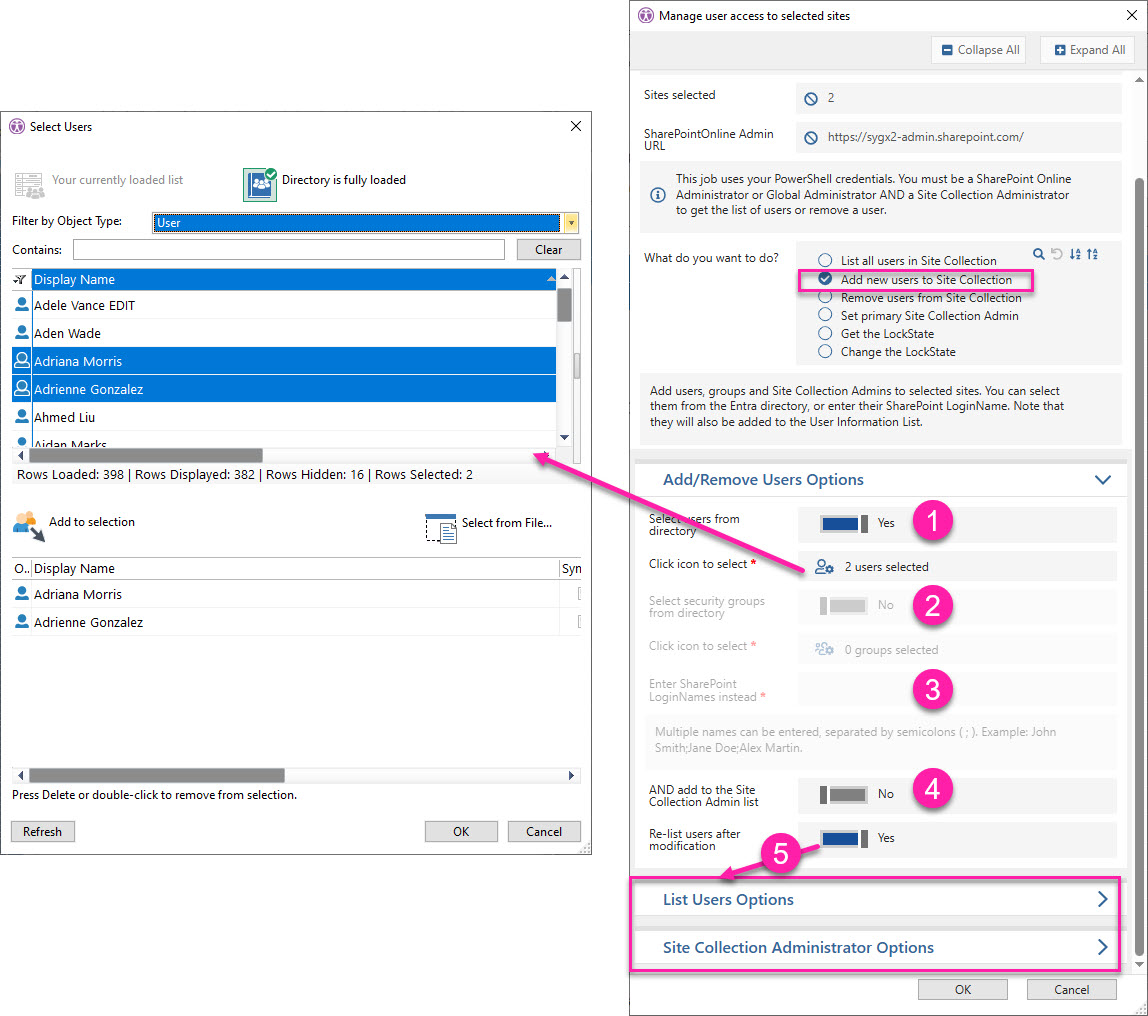
Add users, groups, or site collection administrators to the selected sites. Select users and groups from the Entra directory, or enter SharePoint login names. The added entries will appear in each site’s User Information List. Expand to view detailed options
Use the following options to choose which users or groups to add to the selected sites, whether to make them site collection administrators, and whether to verify the changes afterward.
|
|
Remove users from Site Collection |
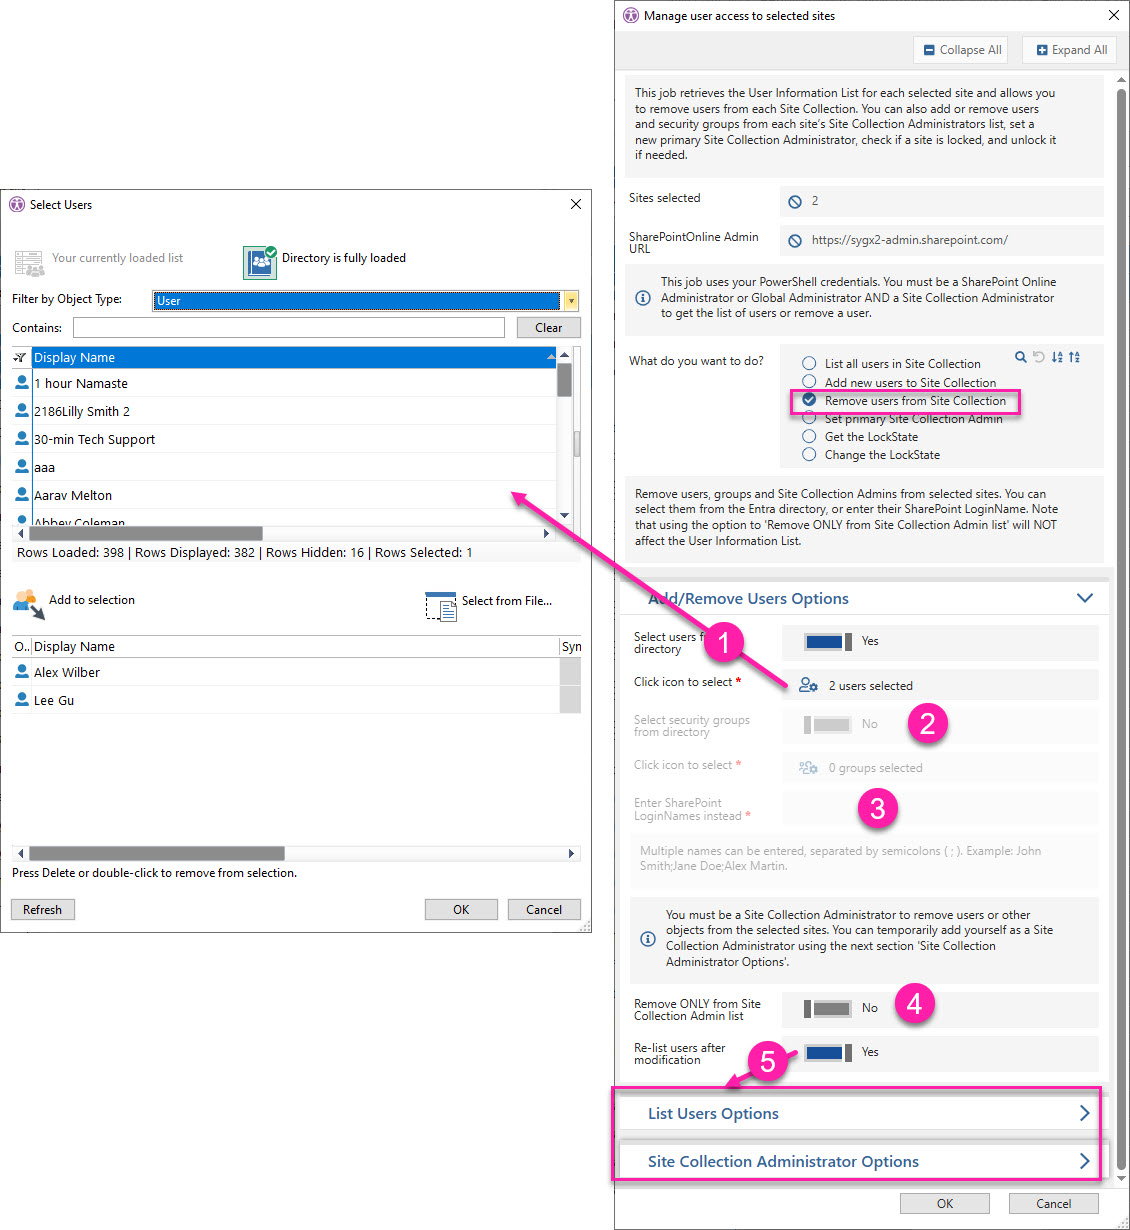
Remove users, groups, or site collection administrators from the selected sites. Select users and groups from the Entra directory, or enter their SharePoint login names. If you choose Remove ONLY from Site Collection Admin list, the entries remain in the User Information List. Expand to view detailed options
Use the following options to choose which users or groups to remove, whether to remove only their site collection administrator status, and whether to verify the changes afterward.
Site collection administrator access required You must be a site collection administrator for the selected sites to remove users or other entries. If needed, use Site Collection Administrator Options in the next section to temporarily add yourself.
|
|
Set primary Site Collection Admin |
Replace the primary site collection administrator for the selected sites. Select one user or security group from the Entra directory, or enter a SharePoint login name. The selected user or group is also added to the User Information List and the site collection administrators list. Expand to view detailed options
Choose one user or security group to make the primary site collection administrator for the selected sites. You can then re-list users to verify the change.
Filter the verification results When you choose Re-list users after modification, consider selecting Only show Primary Site Admin to display just the new primary administrator. 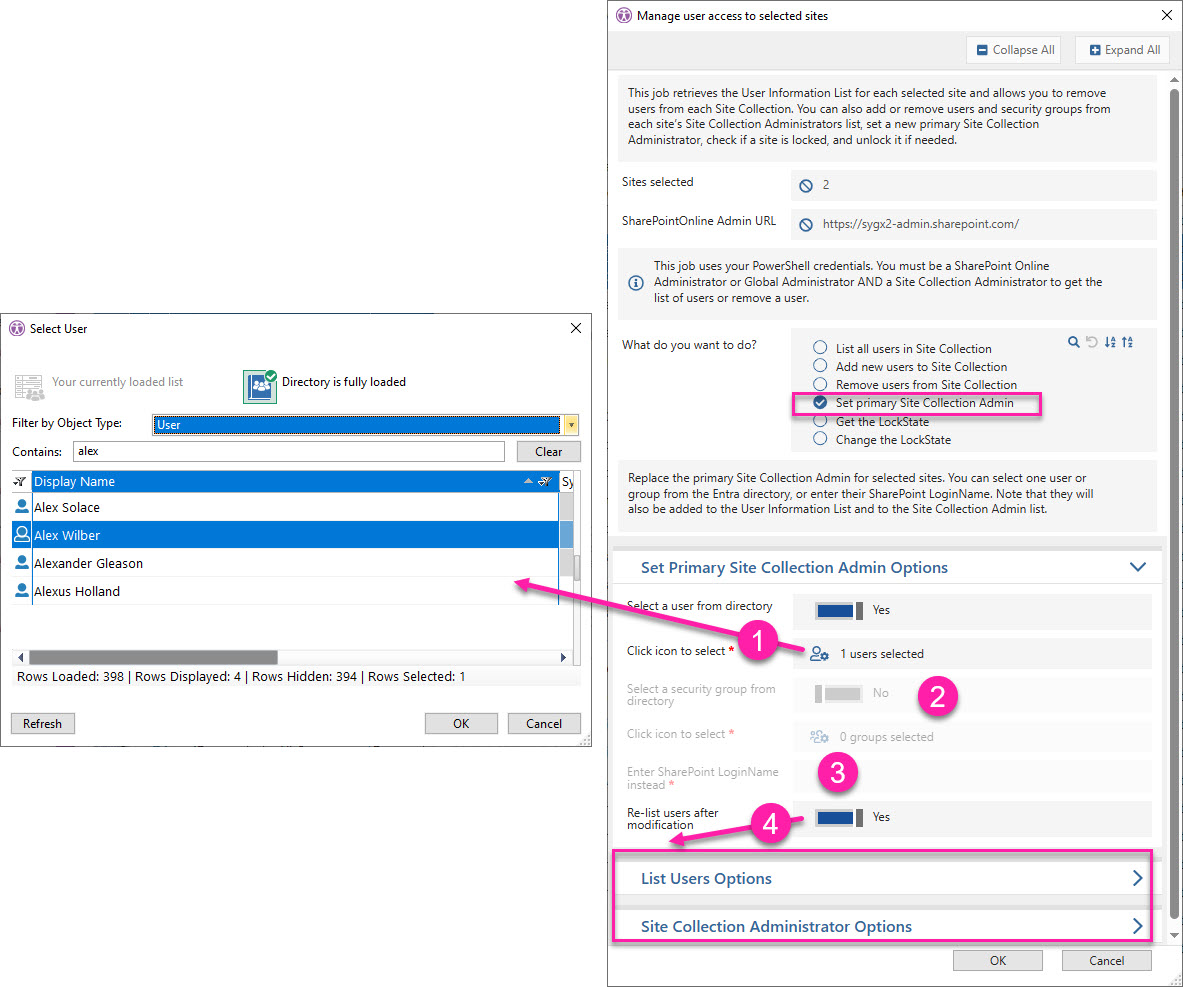
|
|
Get the LockState |
Show the lock state of the selected sites: Expand to view detailed options
Select Get the LockState, then click OK. 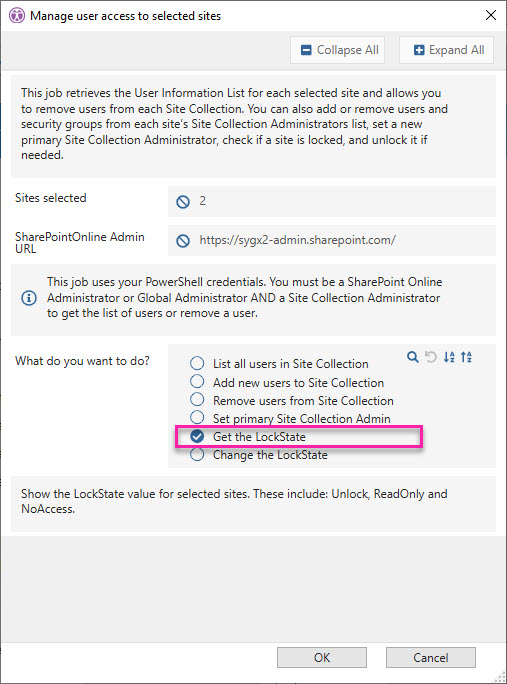
|
|
Change the LockState |
Change the lock state of the selected sites to Expand to view detailed options
Choose the new LockState for the selected sites, then decide whether to retrieve it again to verify the change.
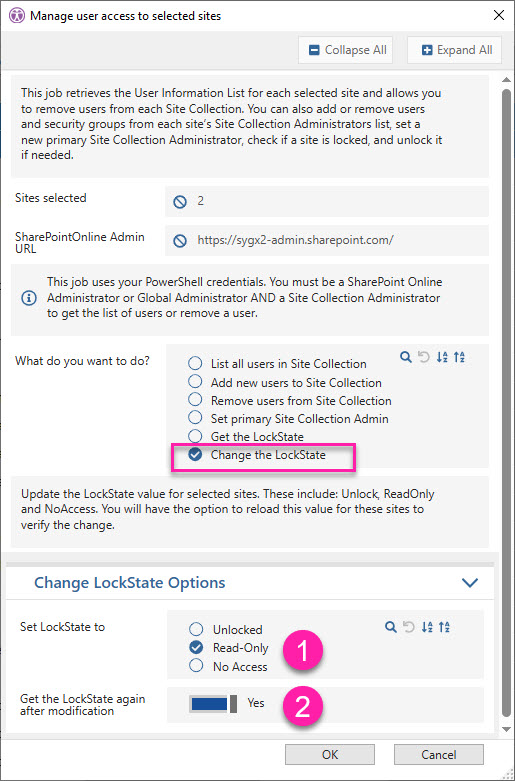
|
-
Optional: Depending on the action you chose in step 2 and your sapio365 session type, use Site Collection Administrator Options to temporarily add yourself as a site collection administrator for the selected sites so you can run the action.
Removing yourself as a site collection administrator afterward does not remove you from the list of users who have access to the sites.
Expand to view details
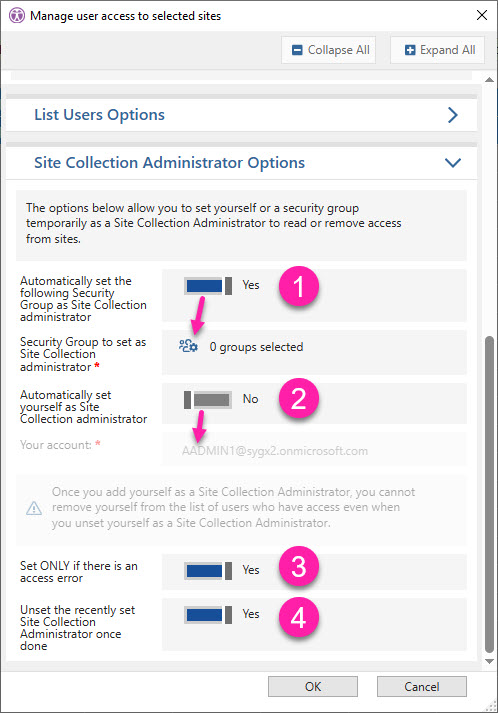
Site Collection Administrator Options
Use these options to temporarily add yourself or a security group you belong to as a site collection administrator when you need access to read or remove users from the selected sites. You can have the job remove that administrator assignment when it finishes.
-
Automatically set the following Security Group as Site Collection administrator: Set to Yes to add a security group you belong to as a site collection administrator for the selected sites. Click the icon to select the group from the directory.
-
Automatically set yourself as Site Collection administrator: Set to Yes to add yourself directly as a site collection administrator for the selected sites, then enter your username.
-
Set ONLY if there is an access error: Leave set to Yes to add yourself or the selected group only for sites where the job encounters an access error.
-
Unset the recently set Site Collection Administrator once done: Set to Yes to remove the administrator assignment added by the job when it finishes.
-
When the job finishes, review the result summary for errors and the columns you selected to add to the GridView.
Verify changes by rerunning the job
Each time you run the job, it overwrites the values in the result columns. If you make a change, such as removing a user from the User List, run the job again as a report to verify the result.