
Before you create a sapio365 RBAC role, you should first decide which actions this role should allow.
Expand the section below to see a permissions table that can help you plan the role’s allowed actions.
Click to see the full list of sapio365 RBAC permissions
List of sapio365 RBAC permissions
The list of permissions is categorized by the module where the action is available:
All Users
|
|
|---|---|
|
1 |
User - Load Last Sign-In |
|
2 |
User - Load Basic Info |
|
3 |
User - Load Personal Info |
|
4 |
User - Load Mailbox Settings |
|
5 |
User - Load OneDrive Info |
|
6 |
User - Load Manager Info |
|
7 |
User - Load Authentication Methods Overview |
|
8 |
User - Load Sponsor Info |
|
9 |
User - Load Authentication Methods Details |
|
10 |
User - Edit Properties in Cloud |
|
11 |
User - Create in Cloud |
|
12 |
User - Delete in Cloud |
|
13 |
User - Edit Password in Cloud |
|
14 |
User - Update Manager |
|
15 |
User - Edit Licenses |
|
16 |
User - Revoke Access |
|
17 |
User - Load Mailbox Info |
|
18 |
User - Edit MFA and Authentication Methods |
|
19 |
User - Load Custom Security Attributes |
|
20 |
User - Load Directory Extensions |
|
21 |
User - View OneDrive Files |
|
22 |
User - Load OneDrive Permissions |
|
23 |
User - Edit OneDrive Permissions |
|
24 |
User - Rename OneDrive Files |
|
25 |
User - Delete OneDrive Files |
|
26 |
User - Download OneDrive Files |
|
27 |
User - Create OneDrive Folders |
|
28 |
User - Add Files |
|
29 |
User - Check-in Files |
|
30 |
User - Check-out Files |
|
31 |
User - Load File Checkout and Retention Info |
|
32 |
User - View Messages |
|
33 |
User - See Mail Content |
|
34 |
User - Load Message Attachments |
|
35 |
User - Edit Message Attachments |
|
36 |
User - Download Message Attachments |
|
37 |
User - Edit Messages |
|
38 |
User - Delete Messages |
|
39 |
User - View Events |
|
40 |
User - Load Events Attachments |
|
41 |
User - Edit Events Attachments |
|
42 |
User - Download Events Attachments |
|
43 |
User - Delete Events |
|
44 |
User - Edit Events |
|
45 |
User - View Contacts |
|
46 |
User - View Message Rules |
|
47 |
User - Delete Message Rules |
|
48 |
User - View Deleted Users |
|
49 |
User - Manage Deleted Users |
|
50 |
User - View Mailbox Permissions |
|
51 |
User - Edit Mailbox Permissions |
|
52 |
User - View Chats |
|
53 |
User - View Chat Messages |
|
54 |
User - Edit Properties On-Premises |
|
55 |
User - Create On-Premises |
|
56 |
User - Delete On-Premises |
|
57 |
User - Edit Password On-Premises |
|
58 |
User - Update Manager On-Premises |
All Groups
|
|
|---|---|
|
1 |
Group - Load Mailbox Info |
|
2 |
Group - Load Directory Extensions |
|
3 |
Group - Load Basic Info |
|
4 |
Group - Load Created On Behalf Of |
|
5 |
Group - Load Team Settings |
|
6 |
Group - Load Allow to Add Guests Setting |
|
7 |
Group - Load Expiration Policy Info |
|
8 |
Group - Load Owner Info |
|
9 |
Group - Load Members Count |
|
10 |
Group - Load Document Library Info |
|
11 |
Group - Load Viva Engage Info |
|
12 |
Group - Load Sensitivity labels |
|
13 |
Group - Load Other Group Settings |
|
14 |
Group - Load Team Channels Count |
|
15 |
Group - Load M365 Group Welcome Message Setting |
|
16 |
Group - Edit Properties in Cloud |
|
17 |
Group - Create in Cloud |
|
18 |
Group - Delete in Cloud |
|
19 |
Group - Edit Members |
|
20 |
Group - Edit Members (including out-of-scope items) |
|
21 |
Group - Edit Owners |
|
22 |
Group - Edit Owners (including out-of-scope items) |
|
23 |
Group - View Delivery Management |
|
24 |
Group - Edit Delivery Management |
|
25 |
Group - Edit Delivery Management (including out-of-scope items) |
|
26 |
Group - View Files |
|
27 |
Group - Load File Permissions |
|
28 |
Group - Edit File Permissions |
|
29 |
Group - Rename Files |
|
30 |
Group - Delete Files |
|
31 |
Group - Download Files |
|
32 |
Group - Create Folders |
|
33 |
Group - Add Files |
|
34 |
Group - Check-in Files |
|
35 |
Group - Check-out Files |
|
36 |
Group - Load File Checkout and Retention Info |
|
37 |
Group - View Events |
|
38 |
Group - Delete Events |
|
39 |
Group - Edit Events |
|
40 |
Group - View Conversations |
|
41 |
Group - Load Conversations Attachments |
|
42 |
Group - Edit Conversations Attachments |
|
43 |
Group - Download Conversations Attachments |
|
44 |
Group - Delete Conversations Threads |
|
45 |
Group - View Sites |
|
46 |
Group - View Deleted Groups |
|
47 |
Group - Manage Deleted Groups |
|
48 |
Group - View Channels |
|
49 |
Group - Edit Channels |
|
50 |
Group - Delete Channels |
|
51 |
Group - Create Channels |
|
52 |
Group - Edit Group Settings |
|
53 |
Group - Edit Global Expiration Policy |
|
54 |
Group - Load Channel Additional Info |
|
55 |
Group - View Channel Messages |
|
56 |
Group - View Channel Files |
|
57 |
Group - View Channel Members |
|
58 |
Group - View Channel Sites |
|
59 |
Group - Load Channel File Permissions |
|
60 |
Group - Edit Channel File Permissions |
|
61 |
Group - Rename Channel Files |
|
62 |
Group - Delete Channel Files |
|
63 |
Group - Download Channel Files |
|
64 |
Group - Create Channel Folders |
|
65 |
Group - Add Channel Files |
|
66 |
Group - Check-in Channel Files |
|
67 |
Group - Check-out Channel Files |
|
68 |
Group - Load Channel File Checkout and Retention Info |
|
69 |
Group - Edit Channel Members |
|
70 |
Group - Edit Channel Members (including out-of-scope items) |
|
71 |
Group - Edit Properties On-Premises |
|
72 |
Group - Create On-Premises |
|
73 |
Group - Delete On-Premises |
|
74 |
Group - Edit Members On-Premises |
|
75 |
Group - Set Owner On-Premises |
All SharePoint Sites
|
|
|---|---|
|
1 |
Site - Load Additional Info |
|
2 |
Site - View Files |
|
3 |
Site - Load File Permissions |
|
4 |
Site - Edit File Permissions |
|
5 |
Site - Rename Files |
|
6 |
Site - Delete Files |
|
7 |
Site - Download Files |
|
8 |
Site - Create Folders |
|
9 |
Site - Add Files |
|
10 |
Site - Check-in Files |
|
11 |
Site - Check-out Files |
|
12 |
Site - Load File Checkout and Retention Info |
|
13 |
Site - View Lists |
Other
|
|
|---|---|
|
1 |
View Tenant Roles and Administrators |
|
2 |
Edit Tenant Roles and Administrators |
|
3 |
Edit Tenant Roles and Administrators (including out-of-scope items) |
|
4 |
Edit Tenant Global Settings |
|
5 |
View Tenant Licenses and Services |
|
6 |
View Tenant Applications |
|
7 |
Edit Tenant Applications |
|
8 |
Delete Tenant Applications |
|
9 |
Load Applications Additional Info |
|
10 |
View Tenant Usage Reports |
|
11 |
View Tenant Sign-ins Report |
|
12 |
View Tenant Audit Logs Report |
|
13 |
View Tenant Devices |
|
14 |
Edit Tenant Devices |
|
15 |
Delete Tenant Devices |
|
16 |
Load Devices' Registered Users |
|
17 |
Edit Tenant Devices Owners |
|
18 |
Edit Tenant Devices Owners (including out-of-scope items) |
|
19 |
Edit Tenant Devices Users |
|
20 |
Edit Tenant Devices Users (including out-of-scope items) |
|
21 |
View Tenant Service Principals |
|
22 |
Edit Tenant Service Principals |
|
23 |
Load Service Principals' Custom Security Attributes |
|
24 |
Copy File to user drive |
|
25 |
Copy File to user drive (including out-of-scope items) |
|
26 |
Copy File to group/channel drive |
|
27 |
Copy File to group/channel drive (including out-of-scope items) |
|
28 |
Copy File to site drive |
|
29 |
Copy File to site drive (including out-of-scope items) |
|
30 |
Run Powershell Command Job |
|
31 |
Run Custom Job |
-
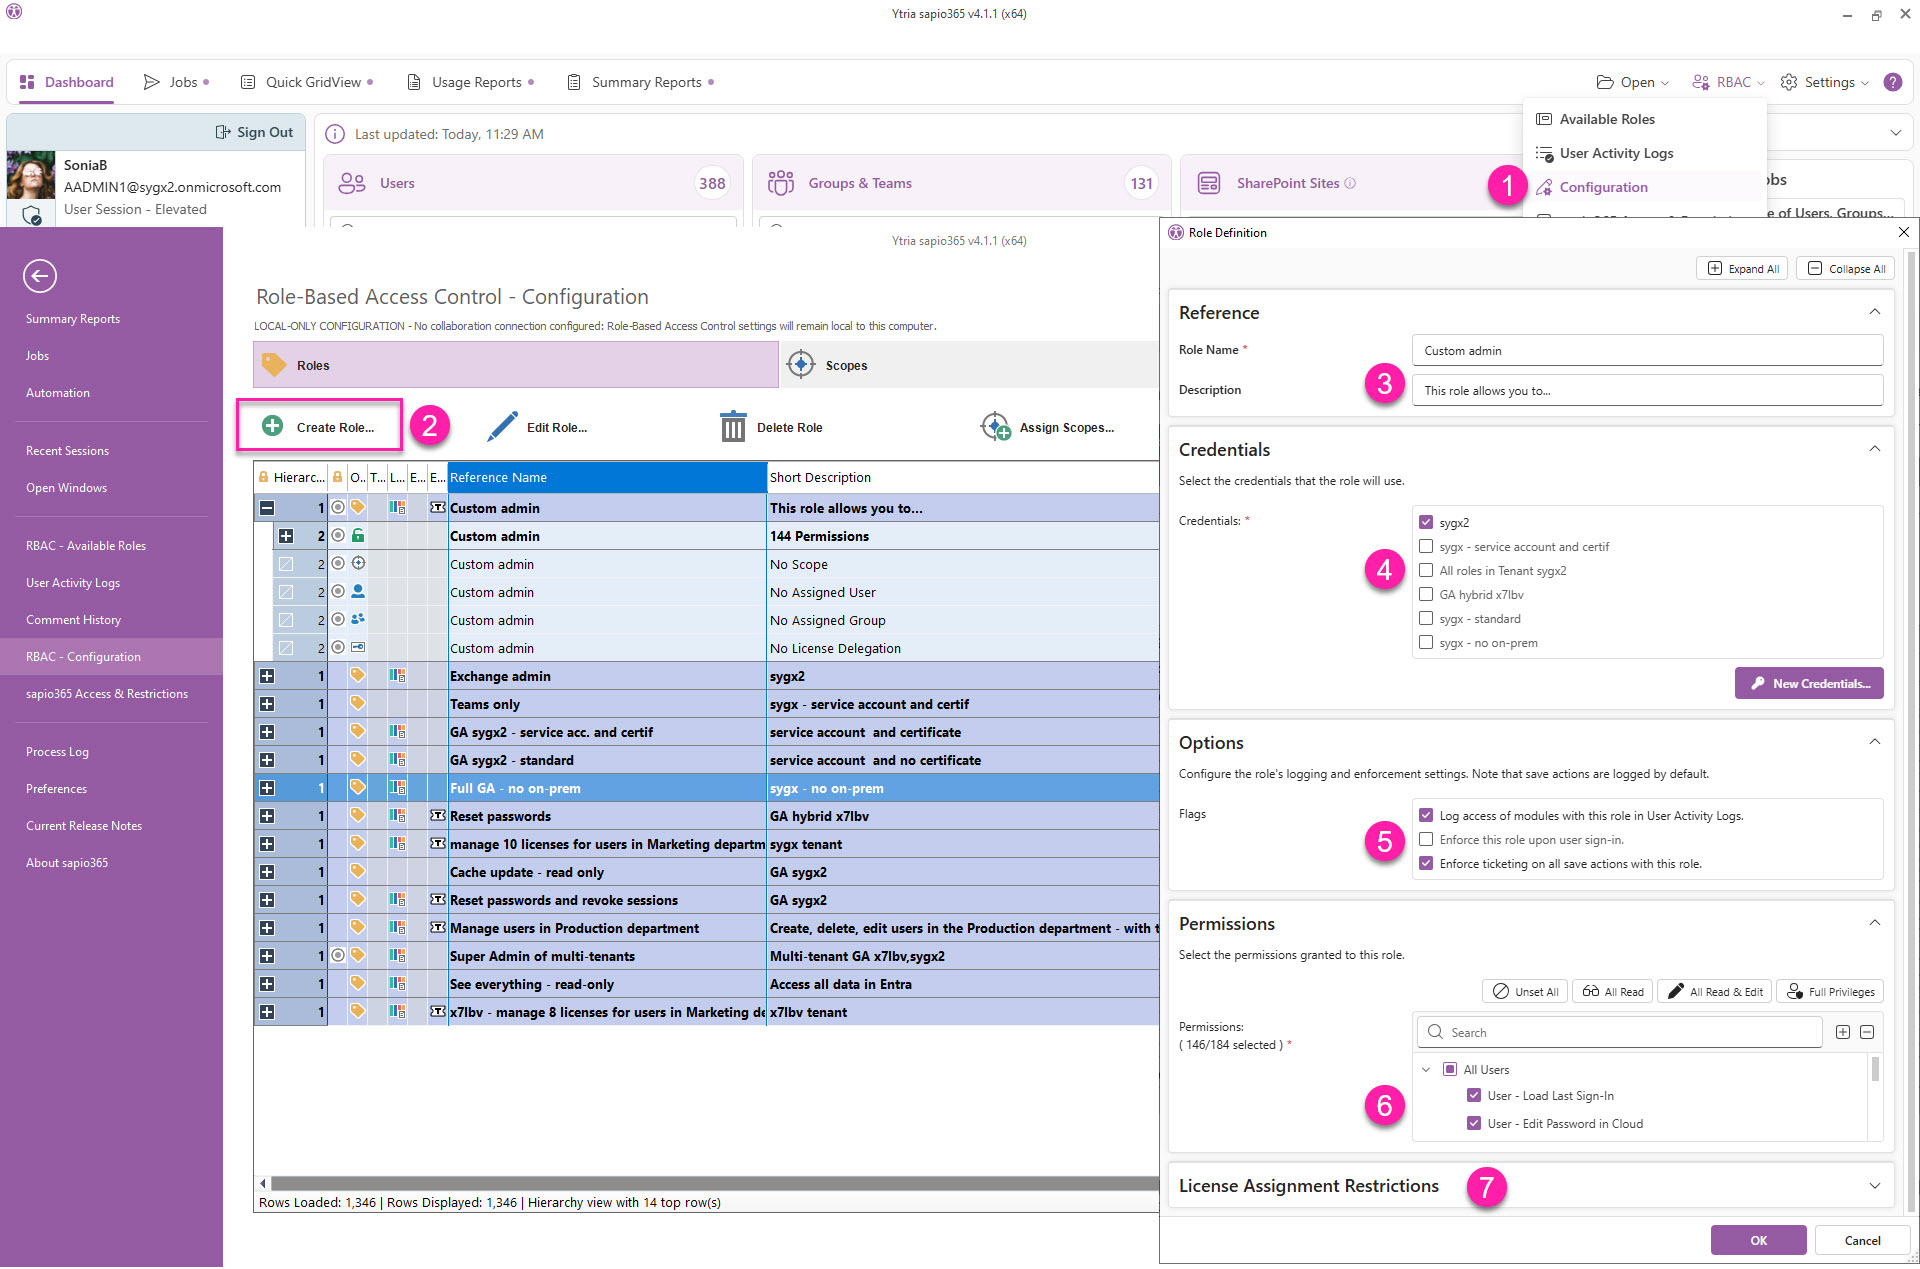
From the Dashboard, go to RBAC → Configuration
-
In Roles, click Create Role.
-
Enter a unique, meaningful name for the role and a description, which will be shown to assigned users.
-
Select the credentials you wish to use with this role. You can create a new one by clicking on the button ‘New Credentials…’ (see how to set up credentials).
-
In Options, select from the following:
-
Log access of modules with this role in User Activity Logs.
-
This option makes sapio365 log whenever a user with that role opens a module, not just when they save changes. These entries can then be found in the User Activity Logs, showing who accessed which module and when so you can audit viewing activity as well as modifications.
-
By default, sapio365 logs all changes saved by sapio365 users in the User Activity Logs.
-
-
Enforce this role upon user sign-in.
-
This option makes it mandatory for any assigned user to take on the role when they sign in to their sapio365 session.
-
-
Enforce ticketing on all save actions with this role.
-
This option makes adding ticket information mandatory for all save actions with this role.
-
-
-
Select sapio365 RBAC permissions to customize the role you are creating.
-
(Optional) The License Assignment Restrictions can be used to limit the number of licenses to manage. Learn more here.
The License Assignment Restrictions section is not available for multi-credential roles. You must select only 1 set of credentials at step #4.
Click OK to save the role, after which it will appear in the grid.
Assign users and scopes
The next step in sapio365 RBAC creation is to define the scope (which sets of users, groups, or sites the role can act on) and assign the users or groups who will be allowed to exercise those permissions.
-
Assign users or groups to sapio365 RBAC roles.