This page explains how to set up recurring cache refresh jobs when you have large volumes of users, groups, or sites in your tenant.
The Cache Update job leverages the ability of the Refresh function to use a single delta query to identify object changes in Entra.
For large environments, it is recommended to schedule separate jobs for users, groups, and sites. This improves performance and makes it easier to see which area (users, groups, or sites) may need attention if a job runs longer than expected, since each job sends an email report that includes its run duration.
If you have not yet loaded all your data into the cache (for example, you’ve never loaded Users, Groups, or Sites), you can build an initial cache with complete data by configuring two jobs with different options.
Here’s a summary of the steps:
-
First create the cache with one-time initial load of basic properties (may long time) to populate the cache. Unless you already launched manually Users, Groups, etc. This has to be done once. Depending on the size, it could take several minutes (for example about 12-15 minutes for 80,000 users) to a few hours (for example, when dealing with a tenant with a few hundred thousand users).
-
Then, set up a one-time high-frequency recurring job that runs in limited batches to fully (all additional data) load all existing objects into the cache without overwhelming your machine’s processing power or memory. This additional load takes longer because multiple queries are executed for each object, which is why it is broken into batches. Running the cache update job in batches also reduces the impact of outages or failures, since only the current batch is affected and the next batch can resume building the cache.
-
Then, schedule a recurring refresh job at your desired frequency (for example, daily or several times per day) to maintain a valid delta link. The delta link lets sapio365 refresh only what has changed, so updates are much faster and you avoid having to reload everything. This ensures you are always working with fresh data.
This approach lets you handle the heavy initial load once, and then rely on efficient, incremental updates to keep your cache current.
Recommendations for tenants with strict Conditional Access policies
If your Conditional Access policies make it hard to reuse credentials (for example, because of frequent MFA prompts or short-lived tokens), we recommend creating an App session.
You’ll need to:
-
Create an App session with app-only credentials based on a registered application and certificate, and shared cache parameters.
-
Use that app-only session in your scheduled jobs so they are not affected by user-based MFA, token revocation, or interactive sign-in requirements.
This approach follows Microsoft’s general guidance to use workload identities and certificate-based credentials for automation in tenants with strong MFA and Conditional Access enforcement, instead of relying on user accounts that require interactive sign-ins.
1 - Create the cache
Before setting up the Cache Update job for users, the users cache must first be created. You can do this by launching Users from the Dashboard if you haven’t already done so. Depending on the size of your tenant, this initial load may take several minutes to complete.
For hybrid tenants, once you load the on-prem attributes you select in Users, the on-prem users cache will be created. This ensures that subsequent cache updates can reuse that on-prem data without having to reload it for all users each time.
2 - Set up a high-frequency one-time limited batch job to load any data that was not loaded (missing)
Now that the cache has been created, set up a job that runs in batches to fully load all existing objects' properties into the cache. This load takes longer because multiple queries are executed for each object. Since querying 10,000 objects is more demanding on a machine’s memory and performance than doing several smaller loads, running this job in batches lets you build the cache incrementally.
What batch size to set?
The bigger the batch size, the faster the cache will be built, but the more taxing the job will be on your machine. The goal is to find the right balance based on your machine’s processing power and available memory.
For example, based on our tests, loading every additional property for a batch of 1,000 users takes at least 1 hour. For a tenant with 10,000 users, initially scheduling this batch job to run every 2 hours (to avoid overlap) would build up a totally complete cache in about 20 hours.
Schedule a one-time job to check duration
If you’re not sure how long a certain batch size will take, run the job with that batch size as a one-time schedule. You’ll receive an email report of its run duration, which you can use to adjust the batch size and recurrence to better fit your environment.
Expand this section for step-by-step instructions
How to set up high-frequency one-time limited batch Cache Update job
For this example, in a tenant with almost 80,000 users, we’ll set up a job to build the cache 1,000 users at a time. Based on our internal testing, this batch size takes at least 1 hour to complete on a typical Windows machine with 32 GB RAM and 4 cores.
To avoid overlapping job runs, we’ll double that time and set the job frequency to every 2 hours, which adds a safe buffer between executions. With this schedule, the entire cache is expected to finish building in about 160 hours when the job runs continuously at that cadence.
-
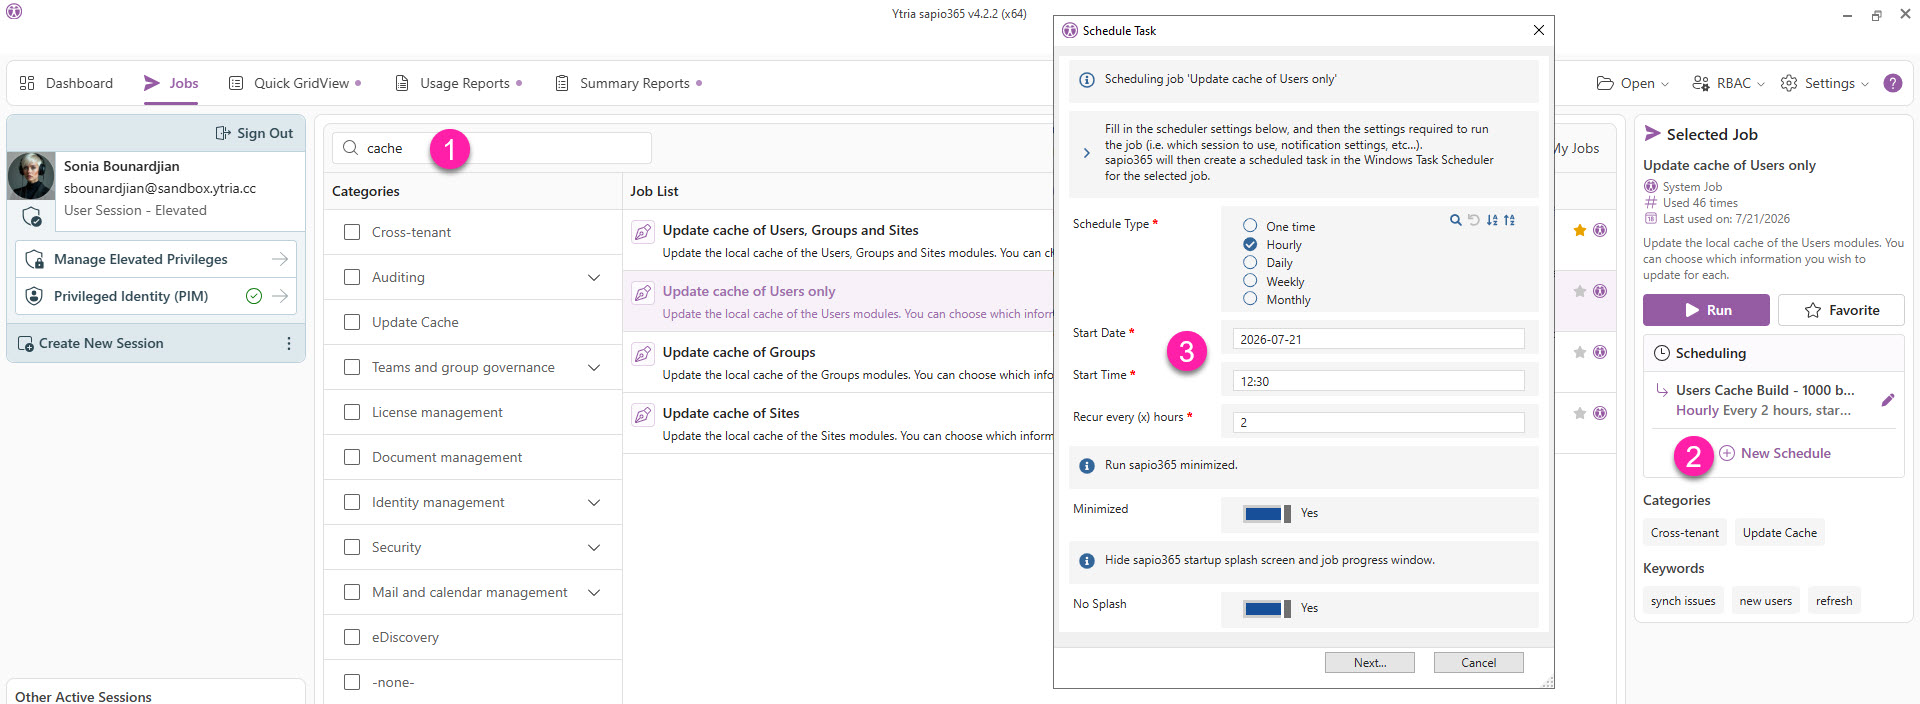
In Jobs, search for ‘cache’.
-
Select the job Update cache of Users only and click New Schedule.
-
Set the job to run Hourly, then specify the start date and time. Set Minimized and No Splash to Yes so the job runs quietly in the background without showing the sapio365 window.
-
After you create the job, you can adjust its frequency directly in Windows Task Scheduler. The job will appear as a task entry under sapio365 in the Task Scheduler Library, where you can set a duration. You can also change other Windows requirements for the job like running without a signed-in user, stored password, etc.
-
-
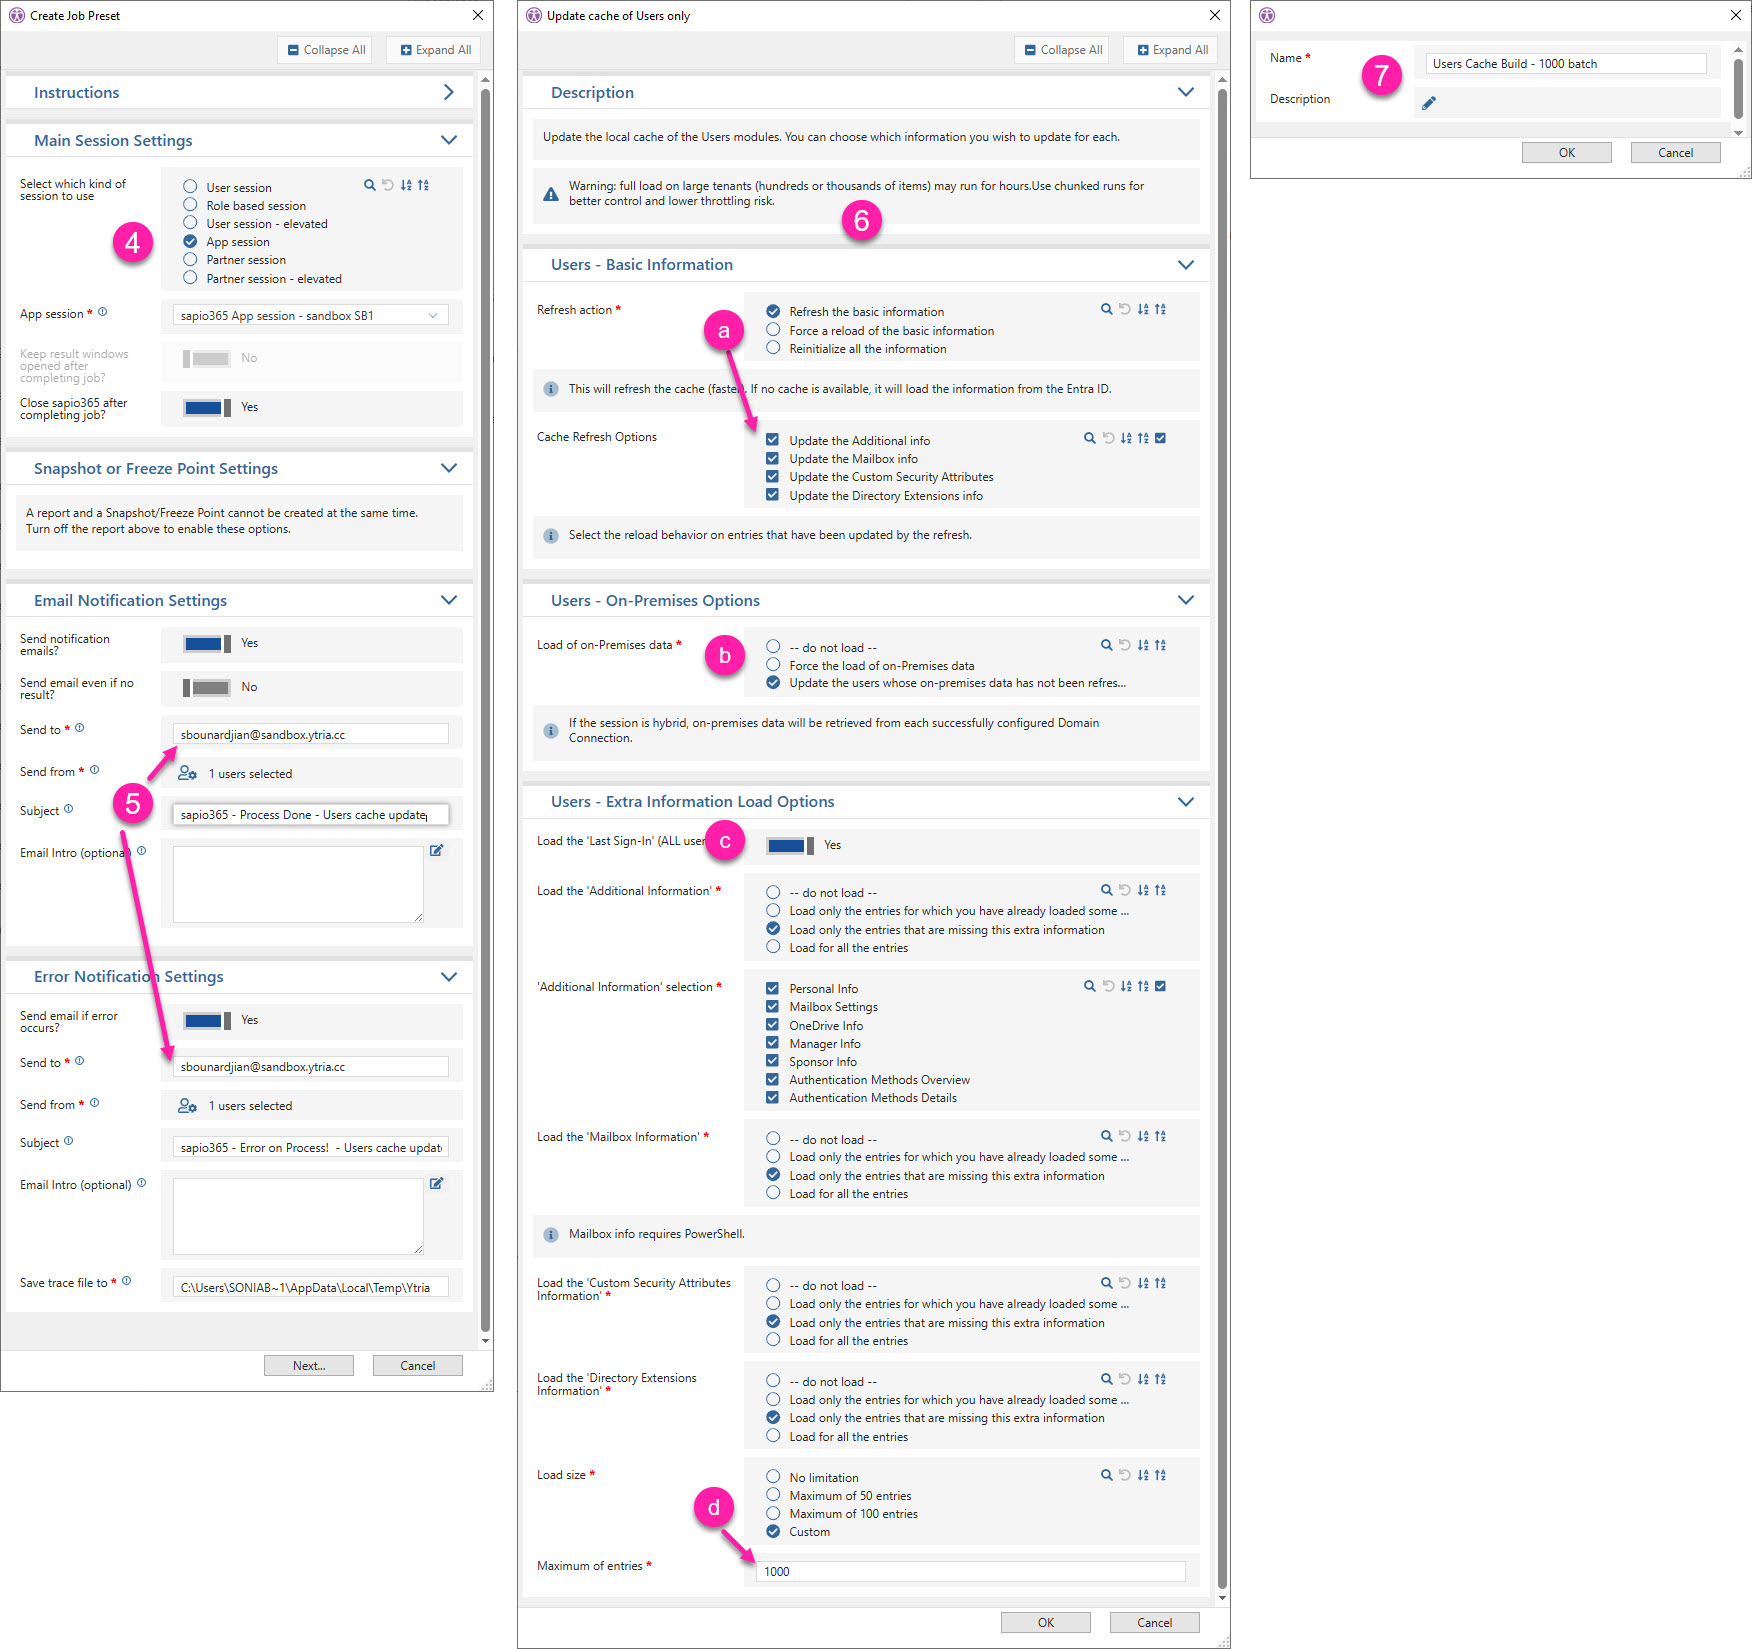
Select your App session. If you’re scheduling the job from the App session, you won’t see this option.
-
Enter your email address to receive both the job report and any error report.
-
You can optionally customize the subject line and add an introduction in the email body to help distinguish this report from other scheduled job reports, which is useful when you have several cache update jobs running.
-
App Session
When you’re using an App session, the Send from field will be automatically set with the email address of the account that created the App session. Click the icon to select another from the directory.
This account must have an active mailbox to email the report.
-
Set the cache update settings as follows:
-
Users - Basic Information
-
Refresh action: select Refresh basic information
-
Cache Refresh Options: select all options for a complete data refresh.
-
-
Users - On-Premises Options (for hybrid tenants)
-
Load of on-Premises data: select Update the users whose on-premises data has not been refreshed since the last Active Directory/Entra synchronization. This option loads the on-premises properties only for users that were updated in Entra since the last sync, instead of loading every user.
-
-
Users - Extra Information Load Options
-
Load the Last sign-in date: set to Yes.
-
Load Additional Information: set to Load only the entries that are missing this extra information.
-
Additional Information selection: select all options for a complete data load.
-
-
Load Mailbox Information: Load only the entries that are missing this extra information.
-
Load Custom Security Attributes Information: Load only the entries that are missing this extra information.
-
Load Directory Extensions Information: Load only the entries that are missing this extra information.
-
-
Load size: set to Custom and enter your batch number to control how many users are processed per run.
-
-
Click OK, then give the job a clear reference name and description. This information will appear in the scheduled jobs panel on the right, making it easier to identify and manage this job alongside other sapio365 jobs.
Optionally, open the Windows Task Scheduler to set the duration or other run settings.
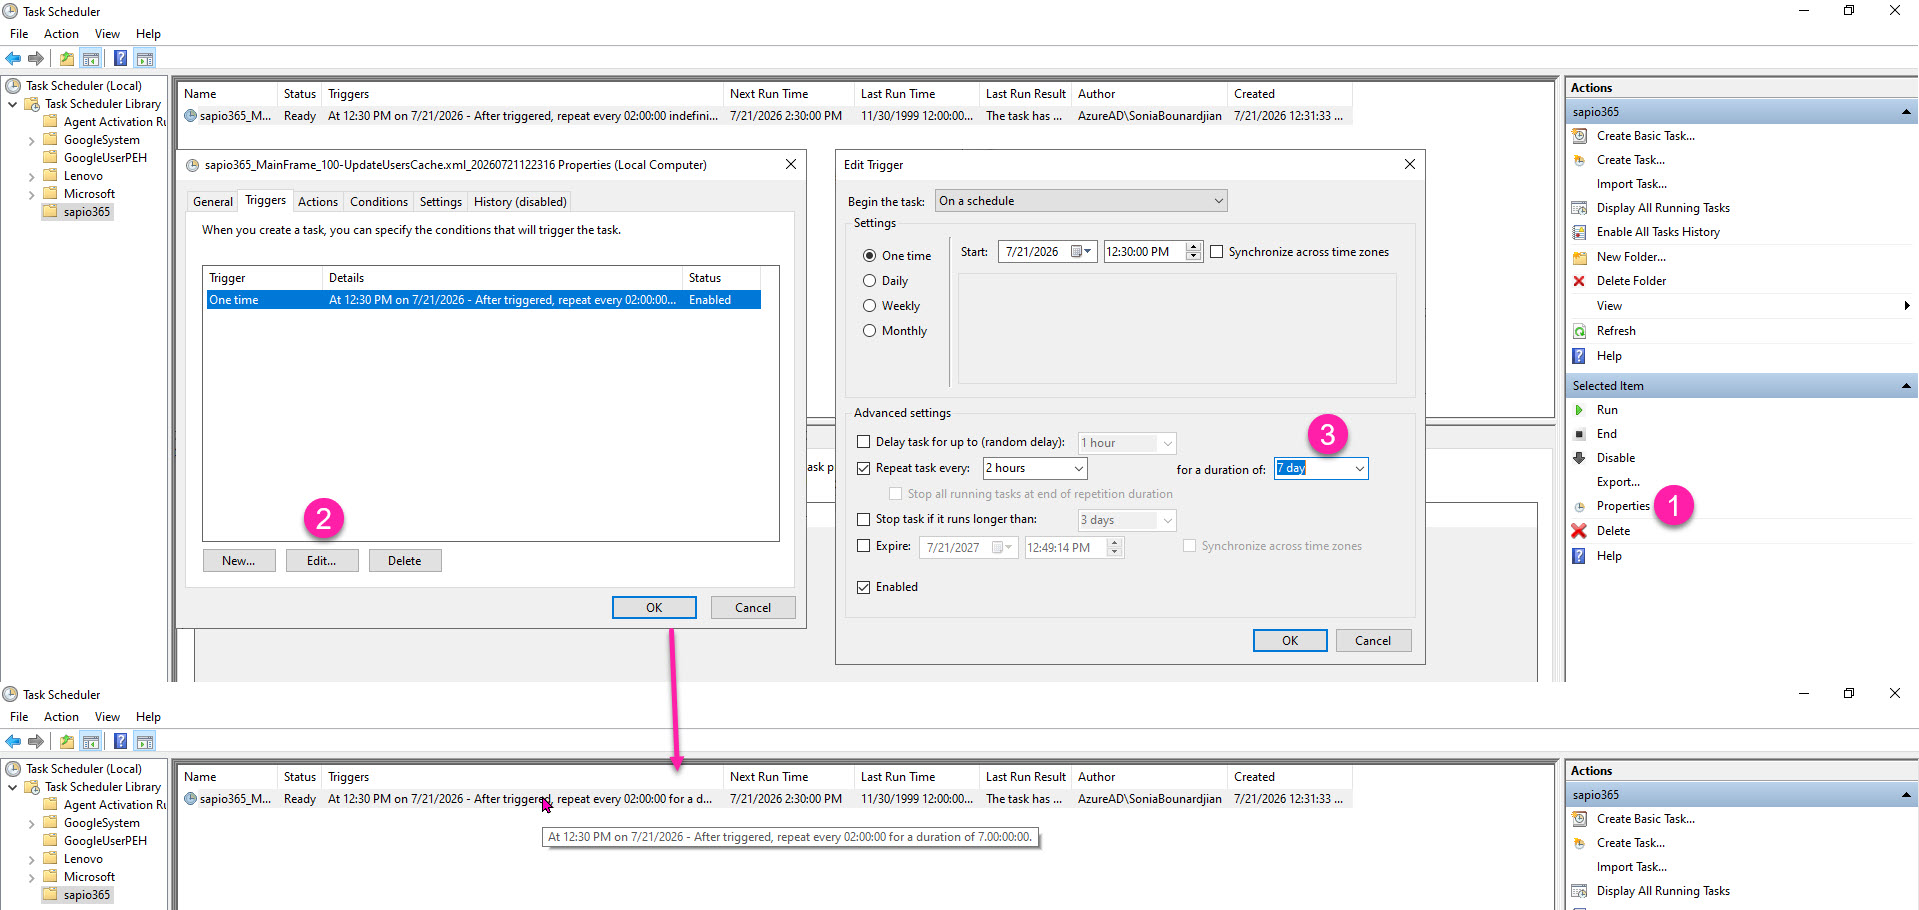
All scheduled sapio365 jobs are listed in the library under sapio365.
-
Select the entry corresponding to the scheduled job and click Properties from the panel on the right or from the right-click menu.
-
Click Edit.
-
Select and set the value “for a duration of”. If the duration you need is not available in the drop-down menu, type over the existing number with your desired value (in our case, ”7 day”), then click OK to save.
3 - Change the frequency of the scheduled job
Once every object has had all its complete properties loaded and is available in the grid, you can modify the job’s run frequency to run daily.
This recurring job refreshes only the properties of objects that were detected as changed in Entra, which significantly reduces the number of queries and the time required to update the cache. The idea is that any sapio365 user can quickly refresh data whenever needed, without having to reload everything.
The simplest way to do this is to change the schedule frequency of the job created in Step 2 from Hourly to Daily in sapio365.
Expand this section for step-by-step instructions
How to change the frequency of the scheduled job
For this example, we recommend scheduling a daily Users cache update job in the early morning so that you can access fresh data as soon as you come in.
The job run duration depends on how often your users' properties change, since sapio365 requests only the changes and loads extra data for affected accounts. And if there are new accounts, the job will load all missing extra data.
-
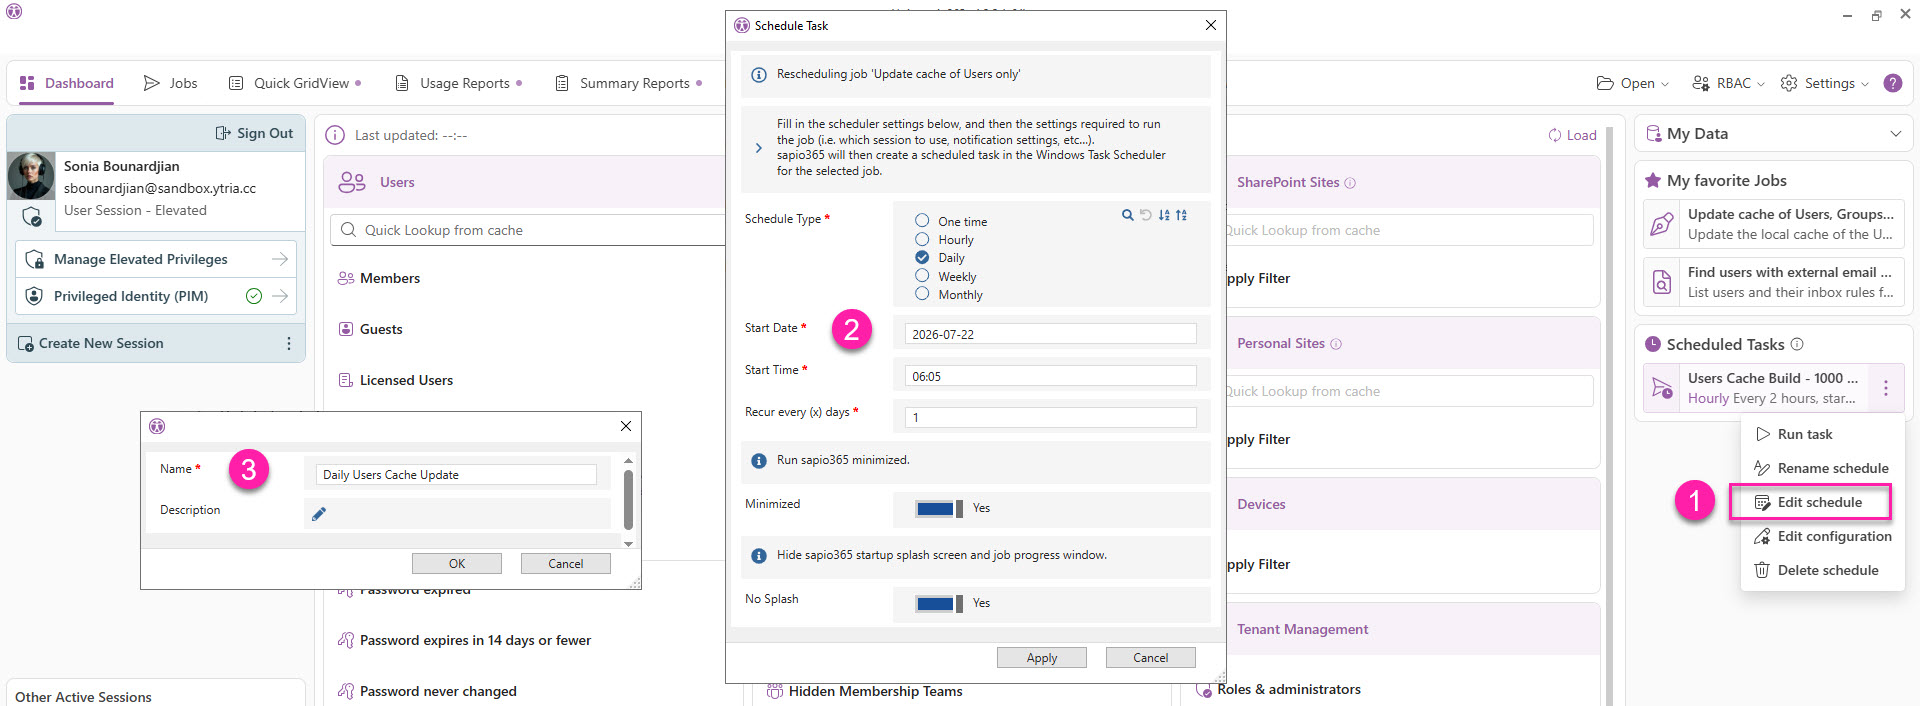
From the right-side Scheduled Tasks panel of the sapio365 Dashboard, click on expansion dots of the job, then click Edit schedule.
-
Modify the frequency, start date and time if needed and click Apply.
Switching from Hourly to Daily will automatically remove the duration if it was previously set in the Windows Task Scheduler.
-
From the same expansion dots, you can also rename the job name in sapio365 to reflect the schedule change by clicking Rename schedule.